biggest pain in the butt working on the bike

Joined
Jul 28, 2007
Messages
2,825
Location
finger lakes ny
Bike
1999 ST1100
Brake piston seals. Taking them out and then getting the new ones back in. I've done it before but man was this a pain.
Pistons. Getting them back in. As above. Still don't have em pushed back in.
Anyone have any words of wisdom about these tasks?
I think I'd rather do my timing belt !
 
I've done it once, front and rear on a MotoGuzzi. I got the square section o-rings out with a dental tool - very carefully so I did not bugger up the groove. Then I applied lots of brake fluid to the inside of the caliper and those o-rings, and also the piston. Then wearing rubber gloves and with the appropriate application of secret verbal incantations I pushed (forced) the piston into the hole.

Good ole swear words work too. The gloves are necessary because everything is slippery. Try not to get the gloves caught as you push the piston home. IIRC, I clamped the caliper in a vise w/ padded jaws. I also blocked the vise (a piece of wood was below the jaws) to prevent my pressure from pushing the caliper right out of the vise's jaws.

Thinking about this now, I might try using a C clamp or one of these irwin quick clamps to push the piston in were I doing this today.
 
The piston should not be hard to push in; once correctly aligned (and assuming a little brake fluid lube) it should press in with gentle finger pressure. If you replaced the seals, did you clean out the grooves in the calliper where they sit? In my experience a build-up of grunge in this area is why the seals bind on the piston in the first place. I use a bit of gentle dental pick work to scrape the corners of the groove clean of any debris and then follow up with a brass brush. Don't pack the grooves with any grease as that will just push the seal harder onto the piston. I clean the piston with a green scotchbrite pad and then a little Autosol metal polish (unless it has a specal coating).
 
The piston should not be hard to push in;
Cleaning the grooves may be part of the problem. I've used chopsticks in the past and tried it this time. But it's a clumsy thing to get done. Attacking them at the correct angle etc. is difficult. They do look pretty good though.
Cheap brass brush would be safe to use? I've thought that no metal inside those pistons was proper. Metal dental pick type thing used carefully?
Used a bit of fine steel wool on the pistons and they look really good. Maybe a green Scotchbrite would be a better choice. And yes, a bit of brake fluid. I had one set of new seals on hand.
Even the C-clamp is not pushing them in. It's as if the piston can't get started/can't fit into the seals with careful alignment.

Looking like my much looked forward to annual trip to OH-STOC likely will be a no go this year.
 
Cleaning the grooves is part of the problem. I've used chopsticks in the past. But it's a clumsy thing to get done. Attacking them at the correct angle etc. is difficult.
Cheap brass brush would be safe to use? I've thought that no metal inside those pistons was proper. Metal dental pick used carefully?
Used a bit of fine steel wool on the pistons and they look Really good. Maybe a green Scotchbrite would be a better choice. And yes, a bit of brake fluid.

Looking like my much looked forward to annual trip likely will be a no go this year.
 
Dunno...
since I'm starting a rebuild once I notice resistance upon pushing the pistons in by hand (like when removing the wheels...) I have no trouble of driving them out with my compressor's air-nozzle (the rubber tip seals perfectly on the banjo bore)...
I insert an assortment of 3 wooden strips to stop/balance the advancing pistons, last is like 3mm thick, from there I can remove them by hand...

Old bikes are tricky... a CX500 from the 80ies... garaged since the late 90ies... :(
I've an old front master with a short braided line here, clamped on a piece of steel tube, stationary in the bench vice, attach line, fill/bleed all with brake fluid, the wooden strips again, pump them pistons out, sometimes with a little aid from the heat gun... or zip-tie the handle and let sit for some time, or over night...

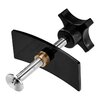
And there pliers avail, use with care to not deform the pistons:

shopping


Rinse all in the parts cleaner, detail & brush with automotive wheel cleaner (the one with the stench of sulfuric acid, rinse with lots of warm water when its turning purple), blow everything dry, a set of workshop picks, an occasional blow with the heat gun to soften them crystals, an ultrasonic dental pick and some nylon wheels in the Dr.Emel tool to clean those grooves...
As final step I throw all items into the ultrasonic cleaner, don't exceed 60°C/140°F as the paint might suffer... retrieve from the bath, dry with compressed air while still hot...

Pistons with pitting, scratches or discolored/scraped galvanization get replaced... OEM, or stainless if avail...
No steel wool, only ferro-free abrasion fleece (the stuff you clean copper pipes prior brazing)...

For putting things together I use designated ATE brake assembly paste, viscosity like silicone grease, but brake fluid compatible...

Takes some time though, so good tunes and some coffee sweeten the job...
 
I insert an assortment of 3 wooden strips to stop/balance the advancing pistons, last is like 3mm thick, from there I can remove them by hand...
I use the same wooden strip method. With either compressed air if the calipers are off the bike, or just pumping with the brake lever if still connected to the bike, like this time.
Removing the pistons has never been a problem. It's getting them back in this time that is not happening this time.
I suppose I'll disconnect the caliper today to see if that helps.
 
Remove the seals and see if the pistons slide in properly. I'm sure they will.

The problem here is that the new seals are not seated properly in the grooves due to gunk that is still in there, effectively reducing the inside diameter of the seal and preventing the piston from sliding in.

You've got to clean out those grooves. I used a piece of one of those large toothpicks held with a needlenose pliers to scour the groove. It's tedious, but works.

All of this is easier done with the caliper off the bike.
 
I'd not use a metal brush (brass) unless I was sure the brush metal was softer than the caliper. Wood tooth picks are great, dental tools applied very carefully deep in the o-ring's groove to scrape out the crud. These are hardened steel, and they can cause a lot of damage if used to scrape the metal and not the grunge.

I liked @ST1100Y's pliers to make sure the o-rings are fully seated in the groove.
 
At least disconnect the hose, so you don't trap air inside...
or open the bleeder, seriously how can you properly inspect and rebuild the caliper leaving it attached to the brake hose. I never had a caliper piston not go back in by hand. And while it's off clean and lube all the slides. Don't use a Scotchbrite to clean the pistons use crocus cloth to polish them.
 
Remove the seals and see if the pistons slide in properly. I'm sure they will.

The problem here is that the new seals are not seated properly in the grooves due to gunk that is still in there, effectively reducing the inside diameter of the seal and preventing the piston from sliding in.

You've got to clean out those grooves. I used a piece of one of those large toothpicks held with a needlenose pliers to scour the groove. It's tedious, but works.

All of this is easier done with the caliper off the bike.
Yeah, I'm going out now to take the caliper off Phil.
Needlenose pliers. Good thought. It's probably how I did this years ago.

Not using steel wool also rings a bell. But I did, so I'm wondering what that does. Promotes corrosion? Pistons are pretty much spotless.
 
Yeah, I'm going out now to take the caliper off Phil.
Needlenose pliers. Good thought. It's probably how I did this years ago.

Not using steel wool also rings a bell. But I did, so I'm wondering what that does. Promotes corrosion? Pistons are pretty much spotless.
I've read when finishing some metals not to use steel wool. Tiny particles of the wool get embeded in the surface and will rust later. I'd expect this to happen when what you are scrubbing with wool is softer than the steel wool - i.e. an aluminum caliper. Probably not a good idea to use steel wool. Scotchbrite is better - and it comes in various grits. I assume you are using these abrasives on the outside of the caliper?

I had no idea you were trying to put the piston in with the caliper on the bike. Talk about making a difficult task harder.
 
...
Cheap brass brush would be safe to use? I've thought that no metal inside those pistons was proper. Metal dental pick type thing used carefully?
...

I'd not use a metal brush (brass) unless I was sure the brush metal was softer than the caliper. Wood tooth picks are great, dental tools applied very carefully deep in the o-ring's groove to scrape out the crud. These are hardened steel, and they can cause a lot of damage if used to scrape the metal and not the grunge.

I have both a plastic and brass O-ring picks. Easy to find on Amazon.
 
Back
Top Bottom