Loose mirror covers?

Okay...I got a handful of the sockets.....and discovered that it's HUGE hard for my fat mitts to reach the nuts....never mind that the bike has to be dismantled to a large extent....
And, of course, I dropped a nut upon install....and the ST swallowed it up! I have none in my "button jar" and will visit the dealer this am to get a couple....

This is HARD!

Have fun!
 
It turns out that a little study and some luck make it unnecessary to dismantle the whole top of the bike....there are holes that a finger may be twisted through that allow holding the nut while the screw and gizmo is removed.....just have the replacement within easy reach.

Thanks
 
The 4 metal 'claws' are the things that clip behing the 'ball joint' ( for want of a better term) on the mirror, and they need to be the correct shape and allow the ball to push into place without being bent out of shape. However, it is the small circular spring which keeps the 4 claws held tigether tightly enough to stop the ball joint from slipping back out. I have had success in removing the claws, slipping the circular spring off, and winding it into a tighter circle before putting it back. This worked very well, for the remainder of the time that i had the bike.

Once id done this, i became more aware of the technique of replacing the mirror - ie rest all three balls against the centre of the appropriate claws simultaneously, and then a firm thump with the palm of the hand, seats the mirror securely. Bumpy road surfaces shouldn't shift the mirror, unless the claws are deformed or broken, or the spring is weak.
:plus1: ^^YEP!^^^
 
Okay...I got a handful of the sockets.....and discovered that it's HUGE hard for my fat mitts to reach the nuts....never mind that the bike has to be dismantled to a large extent....
And, of course, I dropped a nut upon install....and the ST swallowed it up! I have none in my "button jar" and will visit the dealer this am to get a couple....

This is HARD!

Have fun!
Old thread but I found a fix for the lost backing nut for the retaining spring. I have fat fingers so could not get my fingers through small hole in cowl. Instead and this only temporary til I put bike up for the cold long Canadian winter, I found one of those plastic wall anchors and pushed it into the hole. A correct size screw through the retainer clip( bottom one in my case)and it’s fixed. I will of course install it properly next time I take Tupperware off.
 
The mirror cover is secured by three clips but only the top two are to have the spring clips applied. The bottom clips is spring-free. Three clips/two springs. This is shown in parts diagrams.

There is also provision for a plastic strap that tethers the cover to the frame in case it gets knocked off. Not all STs seemed to have sold from dealers with these present or install. They may have been removed or not replaced over the years. I used tie-wraps and they work well enough.
 
Hi
I am having issues with the plastic mirror covers loosening (through worn grommets, I believe). I fear that I may hit a bump or pothole and eject one (or both).

I am unable to find numbers for the grommets that are in the cowl....any help here?

I have entertained the idea of a small stainless steel strap top and bottom on both.

What are others doing to retain these covers?

Thanks!
The problem is likely the METAL retainers on the fairing side. My project bike, (formerly "Lazarus" now "ST One") had been dropped repeatedly by the former owner, and the spring clip looking things on the fairing side were all stretched/bent our of shape. Went to Honda, fished through the parts diagrams, found and ordered about a dozen of them at $7 each.

Here's the b***y part of it -- they screw in, no biggie, to the fairing - 3 per side - but they are held on by LOOSE NUTS (no jokes, how would you say it?) instead of nutplates. You need to have the new parts handy, an assistant who isn't offended by profanity would be a real good idea, a magnetized screwdriver, and the smallest set of hands possible, because you have to reach up inside the fairing and hold the nut in place while you remove the old piece and put on the new one. I did both sides of the bike by myself, and I don't even want to go into the story of how I retrieved the dropped pieces, or how many new and unique foul words I invented along the way.

Bright side: cheap fix, no stiches required, and with a little help would have been easy. I will try to remember to dig out the left over new parts to get the part number, but it was on the diagram at Honda. Had a very odd name.
 
Some pics would be good for those doing fairing & mirror removal and in need of replacement bits.

For the ST1300 mirror covers.
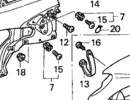
Item # 7, WASHER, MIRROR SETTING SPRING, 3 per side, P/N 88115-MT3-000. These are the retainers that the studs on the mirror cover snap in to.
Item # 15, SCREW, PAN (5X12), 3 per side, P/N 93500-05012-0A.
Item # 18, NUT, FLANGE (5MM), 3 per side, P/N 94050-05000.
Item # 20, CLIP, TUBE (B10), 2 per side, P/N 95002-02100.

Note 1: Item 20 is a spring clip that is installed around the exterior of the fingers of item # 7. It adds additional force to help these fingers more tightly grip the stud that is on the mirror cover. These clips are only used on the two upper positions, not on the lower one.

Note 2: This is from an old parts list. When you check with your favourite parts supplier the newer part numbers should come up if there have been any changes.


1748192917028.png
 
Last edited:
Item # 7, WASHER, MIRROR SETTING SPRING, 3 per side, P/N 88115-MT3-000. These are the retainers that the studs on the mirror cover snap in to.
Item # 15, SCREW, PAN (5X12), 3 per side, P/N 93500-05012-0A.
Item # 18, NUT, FLANGE (5MM), 3 per side, P/N 94050-05000.
Item # 20, CLIP, TUBE (B10), 2 per side, P/N 95002-02100.

Note 1: Item 20 is a spring clip that is installed around the exterior of the fingers of item # 7. It adds additional force to help these fingers more tightly grip the stud that is on the mirror cover. These clips are only used on the two upper positions, not on the lower one.

Note 2: This is from an old parts list. When you check with your favourite parts supplier the newer part numbers should come up if there have been any changes.


1748192917028.png
Thanks for this. I never knew about part no. 20. I haven’t seen it on my ST1100.
 
Item # 7, WASHER, MIRROR SETTING SPRING, 3 per side, P/N 88115-MT3-000. These are the retainers that the studs on the mirror cover snap in to.
Item # 15, SCREW, PAN (5X12), 3 per side, P/N 93500-05012-0A.
Item # 18, NUT, FLANGE (5MM), 3 per side, P/N 94050-05000.
Item # 20, CLIP, TUBE (B10), 2 per side, P/N 95002-02100.

Note 1: Item 20 is a spring clip that is installed around the exterior of the fingers of item # 7. It adds additional force to help these fingers more tightly grip the stud that is on the mirror cover. These clips are only used on the two upper positions, not on the lower one.

Note 2: This is from an old parts list. When you check with your favourite parts supplier the newer part numbers should come up if there have been any changes.


1748192917028.png

Thanks Andrew. I have a few spares of these clips and spring clips. The clips can be brittle, spring clips hard to find, so got a few extra because there was a big delay getting them last time.

I always use the strap (#13) and attach it to the mirror with the screw (#16). The strap is attached to the bike with a cable tie through the eyelet.
 
Back
Top Bottom