
Recently tore into my '04 with the intention of installing the Race Tech fork kit (valves, adjustable caps, springs) and also consider putting in the tapered steering head bearing set I bought earlier this year from CBR when I also purchased both wheel sets. So far now have installed the rear driven flange bearing but left both front and rear wheel bearings alone as they seemed fine upon inspection while both wheels were off the bike.
After much reading about people who've been there, done that, I wasn't sure initially how difficult it was going to be to remove the lower bearing from the steering stem and inquired about the special tool kit as a way to get it done. I'm sure the kit would have helped but as it turns out, a little patience goes a long way and I was able to coerce the lower bearing off the stem without too much issue. Both the upper and lower races tap out without any problem and installation was pretty straightforward as well. The pictures are also in my album but will try to 'tell the story here' for clarity as I still haven't figured out yet how to order the pictures in an album since they seem to randomly reorder themselves after uploading. So here goes:
First of all, get the service manual out. Some places it's not clear, others it's crystal clear, as to the procedures and where on the bike you should be doing what when. Section 15-3 starts the Front Wheel/Suspension/Steering data off with torque values for all the fasteners that need them.
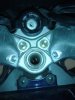
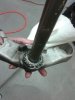
I hadn't had the handlebar center cover off before, this is what's underneath.
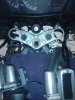
I didn't remove either master cylinder, I just removed the handlebars and set them right side up (so the cylinders don't leak!) on the towel covered tank. If you prefer, find a way to secure them so they don't roll off and hit something unintentionally while you're wrenching on the bike. I had to catch them a couple times during the reassembly process because they were just laying there loose and would roll around as I jostled with the bearing nuts. If you want everything nice and clean, you have the option of removing them completely. The socket bolts were on TIGHT. One almost stripped while taking it out and will probably be trash the next time I have to remove it but it went in fine on the reassemble.
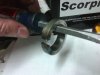
Once they're gone, the handlebar spacer is underneath; removal is straightforward. For those of you that have risers, I assume this is the part that's 'taller' than stock. Mine is still the original. My forks were already out due to the Race Tech upgrade in progress so the next thing was to unfasten the electrical connection to the ignition switch and remove the front brake hose bracket. I considered doing preventive mx on the ignition switch assembly but put it off until another day. Then the stem nut came off, releasing the top bridge. There were several specific size socket purchases for this project. I elected to get impact wrench sockets so I would have them next time or for other projects.
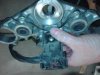
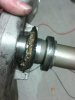
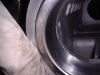
Don't forget to straighten the tabs of the lock washer (two bent down and two bent up) prior to attempting to remove the steering bearing adjusting lock nut and lock washer! Under that is the steering bearing adjusting nut itself, followed by the upper bearing dust cap, race and bearing.
Be sure to grab the bottom steering stem as it will fall out once the adjusting nut is removed.
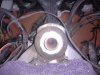
There are 4 pages of special tool processes in the manual but if you look carefully down the stem you can see the cutouts at the bottom where a drift can be used to alternately tap out the bottom race, and likewise the upper race for removal.
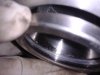
A little patient work with a flat screwdrive on alternating points of leverage around (and behind!) the dust cap and soon you'll see a gap develop as the bearing works its way up the stem. Then you can strike direction against the dust cap/old bearing race. Be careful not to damage the stem! Obviously a replacement required part using this method of removal.
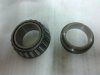
The stock races were much shorter in height than the tapered races and the bearing/race is one piece vs the three pieces (lower race/bearing/upper race) in each ball bearing set.
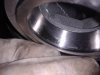
This was my going in gameplan to set the new lower tapered bearing - to use the old lower race but in an upside down orientation so as to only put pressure on the inner portion of the new tapered bearing/race assembly. However, it would have been as difficult as it was the first time to remove it from on top of the new bearing, so...
I encouraged its removal by grinding out a small section of it. After filing off any sharp edges so as not to damage the stem, this is now my reusable bearing set, along with the Home Depot purchase of a 2 foot section of PVC Sched 40 pipe.
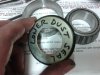
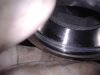
CBR helps make it very clear which dust cover is which.
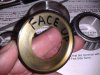
And also which way to install the lower dust cover so the flanges are oriented correctly.
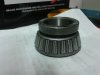
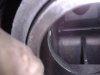
After packing the bearings in heavy waterproof (all I could find is resistant) lithium marine grease, the lower bearing set went on easily with a few smacks of a mallet at the top of the PVC tube. The old race slipped off the stem without any issues.
The last pictures are feeble attempts to show using the old races to set the new races, first the lower (sort of difficult to hold both pieces aligned and tap upwards from under the front end) and the upper (much easier process). Once the new races are started, alternating around the circumference sets them relatively easily. Just be careful to not notch them if whatever you're using as a 'setting tool' slips and isn't entirely on the intended surface.
Once the races were in, it was a simple matter of reversing the disassembly process. The bearing adjustment nut went on okay, but I'm not sure I have the proper 'set' to the bearings. The CBR instructions talk about measuring the amount of torque and several other articles here talk about the difference between how much to set a roller bearing vs a tapered bearing. My steering 'hunts' a bit more than it did before the change, so I will probably go back in at some point and adjust them a little tighter. The notched adjusting nut and lock nut would probably warrant getting, or fabricating, the proper tool next time as the edges of the notches take a bit of abuse when tightening them both. Probably replacement items for my next venture into that part of the bike, but for now, it's back on the road and acceptable. Please feel free to comment/correct/suggest as this site was the place that gave me the encouragement that I could handle this upgrade myself, although I was ready to take the stem to the Honda shop and beg them to remove the lower bearing and press the new. In the end it wasn't required, and I only used everyday tools already in my garage or readily available for purchase on the normal market.
After much reading about people who've been there, done that, I wasn't sure initially how difficult it was going to be to remove the lower bearing from the steering stem and inquired about the special tool kit as a way to get it done. I'm sure the kit would have helped but as it turns out, a little patience goes a long way and I was able to coerce the lower bearing off the stem without too much issue. Both the upper and lower races tap out without any problem and installation was pretty straightforward as well. The pictures are also in my album but will try to 'tell the story here' for clarity as I still haven't figured out yet how to order the pictures in an album since they seem to randomly reorder themselves after uploading. So here goes:
First of all, get the service manual out. Some places it's not clear, others it's crystal clear, as to the procedures and where on the bike you should be doing what when. Section 15-3 starts the Front Wheel/Suspension/Steering data off with torque values for all the fasteners that need them.
I hadn't had the handlebar center cover off before, this is what's underneath.
I didn't remove either master cylinder, I just removed the handlebars and set them right side up (so the cylinders don't leak!) on the towel covered tank. If you prefer, find a way to secure them so they don't roll off and hit something unintentionally while you're wrenching on the bike. I had to catch them a couple times during the reassembly process because they were just laying there loose and would roll around as I jostled with the bearing nuts. If you want everything nice and clean, you have the option of removing them completely. The socket bolts were on TIGHT. One almost stripped while taking it out and will probably be trash the next time I have to remove it but it went in fine on the reassemble.
Once they're gone, the handlebar spacer is underneath; removal is straightforward. For those of you that have risers, I assume this is the part that's 'taller' than stock. Mine is still the original. My forks were already out due to the Race Tech upgrade in progress so the next thing was to unfasten the electrical connection to the ignition switch and remove the front brake hose bracket. I considered doing preventive mx on the ignition switch assembly but put it off until another day. Then the stem nut came off, releasing the top bridge. There were several specific size socket purchases for this project. I elected to get impact wrench sockets so I would have them next time or for other projects.
Don't forget to straighten the tabs of the lock washer (two bent down and two bent up) prior to attempting to remove the steering bearing adjusting lock nut and lock washer! Under that is the steering bearing adjusting nut itself, followed by the upper bearing dust cap, race and bearing.
Be sure to grab the bottom steering stem as it will fall out once the adjusting nut is removed.
There are 4 pages of special tool processes in the manual but if you look carefully down the stem you can see the cutouts at the bottom where a drift can be used to alternately tap out the bottom race, and likewise the upper race for removal.
A little patient work with a flat screwdrive on alternating points of leverage around (and behind!) the dust cap and soon you'll see a gap develop as the bearing works its way up the stem. Then you can strike direction against the dust cap/old bearing race. Be careful not to damage the stem! Obviously a replacement required part using this method of removal.
The stock races were much shorter in height than the tapered races and the bearing/race is one piece vs the three pieces (lower race/bearing/upper race) in each ball bearing set.
This was my going in gameplan to set the new lower tapered bearing - to use the old lower race but in an upside down orientation so as to only put pressure on the inner portion of the new tapered bearing/race assembly. However, it would have been as difficult as it was the first time to remove it from on top of the new bearing, so...
I encouraged its removal by grinding out a small section of it. After filing off any sharp edges so as not to damage the stem, this is now my reusable bearing set, along with the Home Depot purchase of a 2 foot section of PVC Sched 40 pipe.
CBR helps make it very clear which dust cover is which.
And also which way to install the lower dust cover so the flanges are oriented correctly.
After packing the bearings in heavy waterproof (all I could find is resistant) lithium marine grease, the lower bearing set went on easily with a few smacks of a mallet at the top of the PVC tube. The old race slipped off the stem without any issues.
The last pictures are feeble attempts to show using the old races to set the new races, first the lower (sort of difficult to hold both pieces aligned and tap upwards from under the front end) and the upper (much easier process). Once the new races are started, alternating around the circumference sets them relatively easily. Just be careful to not notch them if whatever you're using as a 'setting tool' slips and isn't entirely on the intended surface.
Once the races were in, it was a simple matter of reversing the disassembly process. The bearing adjustment nut went on okay, but I'm not sure I have the proper 'set' to the bearings. The CBR instructions talk about measuring the amount of torque and several other articles here talk about the difference between how much to set a roller bearing vs a tapered bearing. My steering 'hunts' a bit more than it did before the change, so I will probably go back in at some point and adjust them a little tighter. The notched adjusting nut and lock nut would probably warrant getting, or fabricating, the proper tool next time as the edges of the notches take a bit of abuse when tightening them both. Probably replacement items for my next venture into that part of the bike, but for now, it's back on the road and acceptable. Please feel free to comment/correct/suggest as this site was the place that gave me the encouragement that I could handle this upgrade myself, although I was ready to take the stem to the Honda shop and beg them to remove the lower bearing and press the new. In the end it wasn't required, and I only used everyday tools already in my garage or readily available for purchase on the normal market.
Attachments
-
 2012-10-08 13.23.01.jpg146.1 KB · Views: 291
 -
 2012-10-08 13.28.33.jpg149.6 KB · Views: 298
 -
 2012-10-08 15.50.38.jpg48.5 KB · Views: 288
 -
 2012-10-08 15.51.30.jpg149.7 KB · Views: 254
 -
 2012-10-08 15.59.08.jpg99 KB · Views: 249
 -
 2012-10-08 16.00.15.jpg55 KB · Views: 250
 -
 2012-10-08 16.43.28.jpg45.8 KB · Views: 251
 -
 2012-10-08 16.49.57.jpg87 KB · Views: 210
 -
 2012-10-08 16.50.16.jpg90 KB · Views: 186
 -
 2012-10-08 16.56.25.jpg98 KB · Views: 198
 -
 2012-10-08 18.01.06.jpg130.3 KB · Views: 167
 -
 2012-10-08 18.01.20.jpg154.2 KB · Views: 170
 -
 2012-10-08 18.09.34.jpg122.9 KB · Views: 219
 -
 2012-10-08 18.17.10.jpg83.8 KB · Views: 178
 -
 2012-10-08 18.17.34.jpg101.1 KB · Views: 161
 -
 2012-10-08 18.18.02.jpg95 KB · Views: 147
 -
 2012-10-08 18.18.28.jpg111.9 KB · Views: 156
 -
 2012-10-08 18.18.41.jpg100.7 KB · Views: 157
Last edited by a moderator:
