
Subtitle: What I Learned from @Igofar while working on my brakes
The SMC was failing (again) on my ’05 ST13, which had just shy of 90,000 miles on it. So, I went to the Articles section of ST-Owners to read up on the latest know-how to address this problem. Previously, I tried to address the problem by rebuilding the SMC (i.e., replacing the piston and push rod assembly per the Service Manual) in June 2020.
At that time, John Heath’s most recent article (here) hadn’t been posted, nor had his cautionary article about properly sealing the boot on the SMC push rod assembly (here). Moreover, I apparently overlooked @Igofar’s Post #43 (here). If I had seen it, I would not have wasted my time rebuilding the SMC.
Lesson 1, replace the entire SMC, and don’t try to rebuild it.
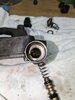
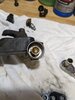
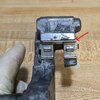
As you can see from the first two pictures below, I did not get the boot to seat properly. Crud was getting in under the boot and into the SMC, causing the piston to periodically seize. Remarkably, the SMC piston wasn’t in bad shape. However, the inlet port (3rd pic) was gunked up with some greenish buildup, which gunk was also found in my rear caliper (more on that later).
Had I not consulted @Igofar on the White Courtesy Phone, I would have merely replaced the SMC as a unit per @jheath and left it at that. However, I would have overlooked a problem that I didn’t know I had.
Lesson 2, sometimes reading the Articles on this site is not enough.
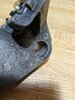
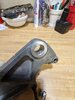
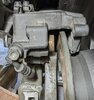
Larry had me remove the rear wheel and inspect the rear brake caliper mounting bracket. As he predicted, the mounting bracket/sub-assembly was damaged in two places (see pics below). Apparently, the spiral markings occur from contact with the caliper stopper bolt. Also, the end of the caliper mounting bracket/sub-assembly where the pad retainer clip sits was no longer “square.” Note the difference on the inner portion as shown by the red arrow. Consequently, I replaced this bracket/sub-assembly with a new one.
Lesson 3: When replacing the stopper bolt, Larry recommends the application of a light coating of anti-seize on the stopper before inserting it into the caliper mounting bracket to reduce the amount of metal-on-metal contact.
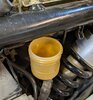
As Larry also predicted, the rear brake reservoir had turned a wonderful shade of amber (see pic below). Apparently, this is a result of heat built up, when the SMC fails it causes the rear brake to drag. Fortunately, the dragging rear brake did not damage my rear rotor.
Because the pistons on all 3 calipers had some corrosion (see pic below) and were 16 years old, I got the bright idea to replace the pistons and rebuild each caliper. I elected not to remove the calipers from the brake lines. This made replacing the piston and dust seals a little awkward, but it is doable. It’s also the fastest way to drain the brake lines. Just be sure you have a pan underneath each caliper when you pop out the pistons.
My original plan was to remove the pistons without separating the outer halves of the calipers (caliper body B). However, I couldn’t get any of the pistons out! So, I ended up removing the 3 flange bolts to halve each caliper. Later, my research suggested that splitting the calipers on my ’05 was required by Honda remove the pistons. Reportedly, this step is not required for the front calipers in later models (’08 and up). Nevertheless, the removal of the B-side did make replacing the seals a little easier.
Lesson 4, you must separate the front and rear calipers in half to remove the pistons on pre-2008 STs.
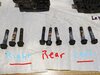
As you can see from the pic below, the flange bolts I removed showed signs of mild to moderate corrosion. Per Larry, I soaked them in some Marvel Mystery Oil for a couple of days, then I cleaned them with a brass-bristle brush. This process removed 99% of the corrosion, so I was able to reuse them. I did, however, put some blue Loctite paste on the threads before reinstalling them. The halves went back together just fine.
**** Per Larry, some Honda Service Manuals contain a misprint, and the torque setting may be incorrect. This can lead to overtightening the flange bolts. The correct torque for these bolts is 24 Ft-Lbs. (32 N-m) ****
Before I replaced the pistons, I made sure that the area behind them in the calipers was clean. As noted earlier, I found more green gunk in the rear caliper. Unfortunately, I was unable to remove all residue sediment until I did the final bleed. Although I didn’t ask Larry, I presume the green gunk is a function of prolonged higher brake fluid temperature, moisture, and time (16 years).
In addition to the new pistons & seals, I also replaced all the boots for the slider pins, and spring clips. Because the right brake bracket/sub-assembly was still in good shape, I elected not to replace it. I did, however, replace the pad retainer bracket with a shiny new one. The finishing touch was a new set of Honda brake pads for each caliper. Hopefully, I won’t need to rebuild the calipers for a while – lol.
Before I started working on the calipers and the SMC, I had removed the front wheel. I took it off to align my forks. However, I found that removing the front wheel made replacing the SMC much easier. While I used John Heath’s write-up as a reference, I deviated slightly from his approach. I elected to remove only the banjo bolts from SMC inlet and outlet ports. Thus, I kept the lower part of the inlet hose intact on the caliper. There is sufficient room to move the inlet hose and install the new SMC assembly without loosening the other banjo bolt.
Lesson 5, removing and installing the SMC is much easier with the front wheel removed.
Although Larry offered to walk me through the process of bleeding my brake lines, I thought I’d try it myself first. After all, I have successfully flushed the brake lines before and thought I knew the process well enough to do it on my own. I was so wrong!
Completely draining the front and rear brake lines introduces a lot of air into the system. I had anticipated that. However, I had not anticipated all places it would get trapped. Although I was able to get a good bit of air out of the rear circuits, I was unable to get all of it. The front circuits were a whole different story, and my best description of what was coming out of the right caliper circuit looked more like foam than fluid. Nothing I did improved the situation.
This prompted another call to Larry on the White Courtesy Phone. Over the next hour and a half, Larry coached me through his process of purging the air.
First, he had me remove the banjo bolt to the front master cylinder (already filled with brake fluid) and asked me to pretend like I was the little Dutch boy by sticking my finger where the bolt had been. Next, he had me gently flick the lever, and tiny bubbles would rise to the top of the reservoir. Then, he had me slowly squeeze the lever, which cause air and fluid to escape past my finger. Before releasing the lever, Larry instructed me to replace the banjo bolt and tighten it finger-tight. He had me squeeze the lever again while slightly loosening the banjo bolt to allow some additional fluid and air to escape. Before releasing the lever this time, Larry instructed me to tighten the banjo bolt. Good and tight is sufficient. In the process of juggling everything, I must have partially released the lever, because there was little resistance when squeezing the lever. Consequently, I had to repeat the process.
Lesson 6, don’t release the lever until your bleeder screws and banjo bolts are tight – lol.
After that, the remainder of the process was similar to the standard flush and fill process, but not identical. Before bleeding the proportional control valve circuit (PCV), Larry had me use the push rod to push the piston in on the SMC and lightly tap it with a wooden dowel. The first time, the piston inside the SMC moved quite easily. After bleeding the PCV, he had me push the piston in a second time and tap the SMC some more. This time, it took a little more effort to move the piston. After bleeding the PCV circuit again, Larry had me push the piston in a third time. Significantly more effort to was required to move the piston this time and I also tapped the SMC some more. Eventually, I was getting clear fluid out of the PCV bleeder and the air was gone. Voila!
Lesson 7, pushing the piston in on the SMC while bleeding the PCV helps purge the air from that circuit.
The remainder of the bleeding process was identical to what I had done before. Although, I would note that Larry had me pounding the rear pedal between bleeds. He also had me tap on the rear caliper and brake lines. Eventually, I got clear fluid with no air bubbles! At that point, I thought I was done. Again, I quickly learned that I was wrong.
Subsequently, Larry had me place a weight on the rear pedal and tie up the front lever and told me to leave them that way overnight. This puts pressure on the various brake lines. Apparently, this is a time-honored means to corral the remaining air trapped in the system.
The next day, Larry had me remove the weight and release the lever. To my dismay, both the lever and pedal were still slightly spongy. Before I knew it, I was going through the entire bleeding sequence again. Apparently, the remaining air in the brake lines found its way into the calipers. Bleeding the system this time would eradicate the last traces of air in the system. Now, both the lever and pedal were nice and firm. This technique was extremely helpful!
Lesson 8, you are not done bleeding your ST’s brakes until you’re good and done.
After reinstalling the tupperware, I went for a short ride (approx. 150 miles) and I was astonished at how strong the front brakes were. I thought my ST’s brakes were good before, but now I know just how good they can be. Although I learned that I didn’t know as much as I thought, I’m really glad I called the White Courtesy Phone. Thanks, Larry!
The SMC was failing (again) on my ’05 ST13, which had just shy of 90,000 miles on it. So, I went to the Articles section of ST-Owners to read up on the latest know-how to address this problem. Previously, I tried to address the problem by rebuilding the SMC (i.e., replacing the piston and push rod assembly per the Service Manual) in June 2020.
At that time, John Heath’s most recent article (here) hadn’t been posted, nor had his cautionary article about properly sealing the boot on the SMC push rod assembly (here). Moreover, I apparently overlooked @Igofar’s Post #43 (here). If I had seen it, I would not have wasted my time rebuilding the SMC.
Lesson 1, replace the entire SMC, and don’t try to rebuild it.
As you can see from the first two pictures below, I did not get the boot to seat properly. Crud was getting in under the boot and into the SMC, causing the piston to periodically seize. Remarkably, the SMC piston wasn’t in bad shape. However, the inlet port (3rd pic) was gunked up with some greenish buildup, which gunk was also found in my rear caliper (more on that later).
Had I not consulted @Igofar on the White Courtesy Phone, I would have merely replaced the SMC as a unit per @jheath and left it at that. However, I would have overlooked a problem that I didn’t know I had.
Lesson 2, sometimes reading the Articles on this site is not enough.
Larry had me remove the rear wheel and inspect the rear brake caliper mounting bracket. As he predicted, the mounting bracket/sub-assembly was damaged in two places (see pics below). Apparently, the spiral markings occur from contact with the caliper stopper bolt. Also, the end of the caliper mounting bracket/sub-assembly where the pad retainer clip sits was no longer “square.” Note the difference on the inner portion as shown by the red arrow. Consequently, I replaced this bracket/sub-assembly with a new one.
Lesson 3: When replacing the stopper bolt, Larry recommends the application of a light coating of anti-seize on the stopper before inserting it into the caliper mounting bracket to reduce the amount of metal-on-metal contact.
As Larry also predicted, the rear brake reservoir had turned a wonderful shade of amber (see pic below). Apparently, this is a result of heat built up, when the SMC fails it causes the rear brake to drag. Fortunately, the dragging rear brake did not damage my rear rotor.
Because the pistons on all 3 calipers had some corrosion (see pic below) and were 16 years old, I got the bright idea to replace the pistons and rebuild each caliper. I elected not to remove the calipers from the brake lines. This made replacing the piston and dust seals a little awkward, but it is doable. It’s also the fastest way to drain the brake lines. Just be sure you have a pan underneath each caliper when you pop out the pistons.
My original plan was to remove the pistons without separating the outer halves of the calipers (caliper body B). However, I couldn’t get any of the pistons out! So, I ended up removing the 3 flange bolts to halve each caliper. Later, my research suggested that splitting the calipers on my ’05 was required by Honda remove the pistons. Reportedly, this step is not required for the front calipers in later models (’08 and up). Nevertheless, the removal of the B-side did make replacing the seals a little easier.
Lesson 4, you must separate the front and rear calipers in half to remove the pistons on pre-2008 STs.
As you can see from the pic below, the flange bolts I removed showed signs of mild to moderate corrosion. Per Larry, I soaked them in some Marvel Mystery Oil for a couple of days, then I cleaned them with a brass-bristle brush. This process removed 99% of the corrosion, so I was able to reuse them. I did, however, put some blue Loctite paste on the threads before reinstalling them. The halves went back together just fine.
**** Per Larry, some Honda Service Manuals contain a misprint, and the torque setting may be incorrect. This can lead to overtightening the flange bolts. The correct torque for these bolts is 24 Ft-Lbs. (32 N-m) ****
Before I replaced the pistons, I made sure that the area behind them in the calipers was clean. As noted earlier, I found more green gunk in the rear caliper. Unfortunately, I was unable to remove all residue sediment until I did the final bleed. Although I didn’t ask Larry, I presume the green gunk is a function of prolonged higher brake fluid temperature, moisture, and time (16 years).
In addition to the new pistons & seals, I also replaced all the boots for the slider pins, and spring clips. Because the right brake bracket/sub-assembly was still in good shape, I elected not to replace it. I did, however, replace the pad retainer bracket with a shiny new one. The finishing touch was a new set of Honda brake pads for each caliper. Hopefully, I won’t need to rebuild the calipers for a while – lol.
Before I started working on the calipers and the SMC, I had removed the front wheel. I took it off to align my forks. However, I found that removing the front wheel made replacing the SMC much easier. While I used John Heath’s write-up as a reference, I deviated slightly from his approach. I elected to remove only the banjo bolts from SMC inlet and outlet ports. Thus, I kept the lower part of the inlet hose intact on the caliper. There is sufficient room to move the inlet hose and install the new SMC assembly without loosening the other banjo bolt.
Lesson 5, removing and installing the SMC is much easier with the front wheel removed.
Although Larry offered to walk me through the process of bleeding my brake lines, I thought I’d try it myself first. After all, I have successfully flushed the brake lines before and thought I knew the process well enough to do it on my own. I was so wrong!
Completely draining the front and rear brake lines introduces a lot of air into the system. I had anticipated that. However, I had not anticipated all places it would get trapped. Although I was able to get a good bit of air out of the rear circuits, I was unable to get all of it. The front circuits were a whole different story, and my best description of what was coming out of the right caliper circuit looked more like foam than fluid. Nothing I did improved the situation.
This prompted another call to Larry on the White Courtesy Phone. Over the next hour and a half, Larry coached me through his process of purging the air.
First, he had me remove the banjo bolt to the front master cylinder (already filled with brake fluid) and asked me to pretend like I was the little Dutch boy by sticking my finger where the bolt had been. Next, he had me gently flick the lever, and tiny bubbles would rise to the top of the reservoir. Then, he had me slowly squeeze the lever, which cause air and fluid to escape past my finger. Before releasing the lever, Larry instructed me to replace the banjo bolt and tighten it finger-tight. He had me squeeze the lever again while slightly loosening the banjo bolt to allow some additional fluid and air to escape. Before releasing the lever this time, Larry instructed me to tighten the banjo bolt. Good and tight is sufficient. In the process of juggling everything, I must have partially released the lever, because there was little resistance when squeezing the lever. Consequently, I had to repeat the process.
Lesson 6, don’t release the lever until your bleeder screws and banjo bolts are tight – lol.
After that, the remainder of the process was similar to the standard flush and fill process, but not identical. Before bleeding the proportional control valve circuit (PCV), Larry had me use the push rod to push the piston in on the SMC and lightly tap it with a wooden dowel. The first time, the piston inside the SMC moved quite easily. After bleeding the PCV, he had me push the piston in a second time and tap the SMC some more. This time, it took a little more effort to move the piston. After bleeding the PCV circuit again, Larry had me push the piston in a third time. Significantly more effort to was required to move the piston this time and I also tapped the SMC some more. Eventually, I was getting clear fluid out of the PCV bleeder and the air was gone. Voila!
Lesson 7, pushing the piston in on the SMC while bleeding the PCV helps purge the air from that circuit.
The remainder of the bleeding process was identical to what I had done before. Although, I would note that Larry had me pounding the rear pedal between bleeds. He also had me tap on the rear caliper and brake lines. Eventually, I got clear fluid with no air bubbles! At that point, I thought I was done. Again, I quickly learned that I was wrong.
Subsequently, Larry had me place a weight on the rear pedal and tie up the front lever and told me to leave them that way overnight. This puts pressure on the various brake lines. Apparently, this is a time-honored means to corral the remaining air trapped in the system.
The next day, Larry had me remove the weight and release the lever. To my dismay, both the lever and pedal were still slightly spongy. Before I knew it, I was going through the entire bleeding sequence again. Apparently, the remaining air in the brake lines found its way into the calipers. Bleeding the system this time would eradicate the last traces of air in the system. Now, both the lever and pedal were nice and firm. This technique was extremely helpful!
Lesson 8, you are not done bleeding your ST’s brakes until you’re good and done.
After reinstalling the tupperware, I went for a short ride (approx. 150 miles) and I was astonished at how strong the front brakes were. I thought my ST’s brakes were good before, but now I know just how good they can be. Although I learned that I didn’t know as much as I thought, I’m really glad I called the White Courtesy Phone. Thanks, Larry!
Attachments
-
 Crap Inside.jpg112.4 KB · Views: 123
 -
 Crap Under Boot.jpg105.5 KB · Views: 122
 -
 Inlet Port.jpg133.5 KB · Views: 118
 -
 Stopper bolt Hole 1.jpg143.8 KB · Views: 119
 -
 Stopper bolt Hole 2.jpg148.9 KB · Views: 120
 -
 Pad Retainer.jpg182.2 KB · Views: 119
 -
 Rear Res.jpg157.5 KB · Views: 116
 -
 CW Rear Brake (2).jpg193.3 KB · Views: 104
 -
 Caliper Flange Bolts.jpg138.3 KB · Views: 109

