The means of production has been seized

Clutch lever bushing
The Honda part Number 2285-MBO-006 is $10
The Suzuki part number 59892-08A00 is $3 and exactly the same part.
Thanks for the information- Good to have an alternate if needed.
Curious to know how you found this out.
Correction in case anyone is searching online by part number- P/N is 22885-MB0-006. (Zero instead of O, as in oh)
 
However, one I'm not terribly concerned over it given this part's application.
WHAT?? What if that brass isn't MilSpec in accordance with the OEM part. It could seize imparting clutch functionality and send you careening into traffic where you might be mowed down by a Farms in Berkley truck and die a fiery death!

:redface-2x:

Seriously I applaud your project. A fun way to spend some time. Making STuff is so cool.

Its failure mode will be slow, and easily monitored. I'm not worried, frankly. Will report back after a few thousand miles of service.
Indeed. As I rethink my analysis a fiery death doesn't seem particularly likely. Much ado I say. However as I don't possess any High School Metal Shop kit I'd be tempted to investigate the Suzuki Alternative. But even if I had a little Unimat I'd be tempted to roll my own. Just because that looks so damn cool. Good on ya STR!
 
Clutch lever bushing

The Honda part Number 2285-MBO-006 is $10

The Suzuki part number 59892-08A00 is $3 and exactly the same part.
Nice one. Motorcycles are an amalgam of all sorts of parts from many manufacturers, so (one assumes) the OEM parts price includes a significant mark-up to cover the repackaging and warehousing costs. Suzuki must be more efficient at this part....
 
Thanks for the information- Good to have an alternate if needed.
Curious to know how you found this out.
Correction in case anyone is searching online by part number- P/N is 22885-MB0-006. (Zero instead of O, as in oh)

This replacement was discussed in my Valkyrie group. I’ve replaced quite a few of them on My Valkyries. I have about 375,000 miles on my three. That’s a lot of clutch squeezes.
 
It sounds like a lot of effort for a tiny piece, but I've often gone down that rabbit hole myself.

As does every hunter that justifies it by "how much money we'll save on paying for meat!" :laugh:

And knowing Honda, they probably put as much or more into the original design. If anything, the cost of the original is somewhat justified by all of your own machinations to reproduce it.

My guess for material is a good corrosion resistance and easy turning/machining despite having been cold worked for strength. Annealed rod would not be wise. My stab would be a 623 aluminum bronze.

If it's not obvious, the point of these parts is to be the sacrificial wear component in the clutch lever/master cylinder. You replace this instead of wallowing out the aluminum of the lever or wearing down the rod extending from the master cylinder piston.

Yeah, and I'm sure someone, sometime, defined the preferred alloy for all the reasons cited, but in the end it's a bushing guys. Yeah, when worn there's a noticeable effect on the bike's behavior. Every fraction of a millimeter of wear is that much less the lever hardware is able to depress the piston of the master cylinder. Eventually the reduced clutch engagement manifests as rough shifting.

There's a project planning tool called an FMEA - Failure Mode Effects Analysis. If you don't know what that is, you make a table of all the possible failure modes one, or preferably several persons knowledgeable in the field, can come up with and then you rate them on things like how likely is it to fail, if it fails how detrimental is it to the system, etc... Then you rate each on a scale that goes from good to bad in some manner, sum up the scores and use that to make decisions.

This bushing rates so low on a failure likelihood and severity scale that it barely registers. It's not going to fall out. Just because it's not marine grade, mil-spec brass, it's not going to corrode and blow away when I'm not watching. It's not going to gall and seize in the lever and do further damage. In fact, the clutch would still work even if it's not there! It wouldn't work as well. But I wouldn't be stranded beside the road either. It's just going to wear away slowly like the OEM version, but just maybe a little faster. So what? I've got eight more spares in the drawer. Bring it on!

Some of you have figured out that the cost of the Honda part - though outrageous - was only a pretext to get into the shop and hone my skills at making chips. I do this because I enjoy it and to make me a better mentor for the high school kids on our robotics team. The robots these students design will often include multiple copies of the same part. You know the fastest way to make many examples of parts that are useless because they're not identical? Make them one at a time, or better yet, give the same drawing to four students and put them each in front of their own mill and have them make the same part. Not gonna happen. Useless.

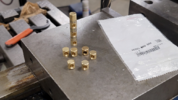
Instead, where possible do operations, like turning the brass rod to a specified diameter, on a length of material sufficient to make several parts. Viola! they're all the same diameter, or at least to the level of your ability to make a 150mm rod to a uniform diameter. You need holes in those rods? Chuck the rod in a vise so it allows you to access and drill them all with one setup.

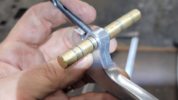
Which comes to the parting into individual bushings and ensuring they're the correct length and the hole is centered. Of the critical features - bushing diameter, hole diameter and depth, and bushing length - the bushing length is the least critical. Which is why I saved it till last and used the most janky way to marking the parts to machine to length. I put the partially completed bushing into the lever and used that #8 drill as an alignment pin and then traced a line around the bushing with an ultrafine Sharpie to mark how much material to remove. Worked like a charm.

I'm better for this. I think the students I mentor will be better for this. I spent zero dollars and now have a lifetime supply of clutch lever bushings which today Partzilla retails for $132.38.
 
I have a few, maybe more things that if You looked at the return on investment, It would be long after I'm dead and gone. I could probably save a lot of money, maybe even be rich if I base everything on dollars and cents. Some things you can't put a price on and one of them is the satisfaction of doing something with your hands. Some people say it's therapeutic.
 
You replace this instead of wallowing out the aluminum of the lever or wearing down the rod extending from the master cylinder piston.
Unfortunately the bore in the clutch lever is often worn as well necessitating replacing the lever. I wish that they had made the clutch lever using the same materials as the brake lever. In that case only the sacrificial bushing would need to be replaced most often.

I wholly support your efforts and encourage you to do more projects like this. I no longer have access to any sophisticated machinery but if I had a lathe I would happily spend $10.00 plus my time to make a $2.00 part. It is about the satisfaction of making it, not the dollars saved.
 
IIRC, calipers were not the measuring instrument of choice. My high school shop had micrometers - beat up but still working.
 
Bushing-palooza day 2:

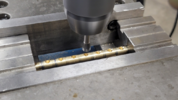
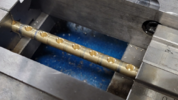
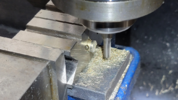
Next op? Countersinking the holes. I used a fluteless countersink. Since I had broken down the setup to drill the holes, I used the drill as a locating pin to position the part similar to before and then zero the DRO so I can drive to the proper location for countersinking.

1748014935751.png

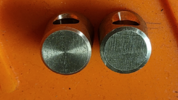
You'll see later when comparing the finished parts that the OEM version used a countersink with a steeper angle... I think. But, so what? It's just a countersink to break the sharp edge.

1748015017791.png

Next step is marking where to machine to for length. I inserted the rod into the lever then used the same #8 drill as a locating pin. I used an ultrafine Sharpie to mark a line around the rod for each bushing.

1748015234525.png

1748015265260.png

Yeah, that marking I did on the lathe didn't turn out to be as useful as I hoped, but that's part of the learning process.

I decided to use the mill to make smooth, square cuts on the bushings. In a perfect world I'd use the lathe and a cutoff blade, but the current state of the five lathes made using the mill easier. Think lack of rigidity in the tool and setup. High School Metal Shop

One by one, I'd face the end of the rod to the Sharpie mark, take it to a bench vise, cut between the lines with a hacksaw, then face the other end of the singulated bushing in the mill followed by the end of the rod closest to the next bushing. Rinse and repeat... eight more times.

Followed by a final trip to the lathe to chamfer the edges. Remember, chamfers are what separate us from the animals.

(If you want to see a far more skilled, but still learning machinist do her thing with brass in the construction of a working, scale, steam locomotive engine and tender, visit Blondihacks Youtube channel https://www.youtube.com/c/Blondihacks Quinn Dunki is her name and her videos are awesome, entertaining and quite educational)

1748015720801.png

1748015691780.png

Now the good part. How did they work?

Well, with the worn bushing, I had about 30mm / 1.2" of free play at the lever end.

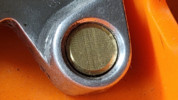
The bushings fit the lever perfectly. I would characterize between a free fit and loose fit. Equal to the OEM certainly.

1748016090275.png

1748017154649.png

1748017125590.png

Yes, that's not an ST lever. It's from a another Honda from the same era with a hydraulic clutch, the specific model escapes me at the moment. I like it. No flames, please.

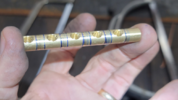
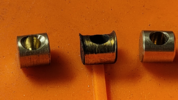
The bushing I made is on the left, the Honda OEM on the right, and the worn example in the middle.

1748016538082.png

Interesting things to point out here. One, the amount of wear on the center bushing is at least equal to the reduction in the distance the the lever is able to depress the piston in the master cylinder. Two, that's a hole in the worn bushing. Or more specifically a through hole! The wall of the bushing was worn away and the rod was now pressing on the interior wall of the lever itself. It left a mark. A small groove maybe about 0.5mm / 0.020" deep.

With my cottage industry bushing in place, I now have effectively zero play in the lever. Just enough that I know the rod does not have pressure on it at idle. :thumbsup:

I'm very pleased with the result and actually like the linear tooling marks from the mill in place of the circular marks on the OEM from the turning operation that made it. :)

1748017403479.png
 
IIRC, calipers were not the measuring instrument of choice. My high school shop had micrometers - beat up but still working.

Still true, but for the tolerances these parts require, calipers are sufficient. If I were fitting to bearings or the like, yes, the micrometer would come out.

Plus, the digital micrometer I did bring, had a dead battery! :(
 
Nice one. Motorcycles are an amalgam of all sorts of parts from many manufacturers, so (one assumes) the OEM parts price includes a significant mark-up to cover the repackaging and warehousing costs. Suzuki must be more efficient at this part....

It would be interesting to know how replacement parts are identified and then managed initially and then over the life cycle.

By way of example, the ST1100's first year of production was 1990. Honda must have pulled a percentage of parts from production to package them separately and then inventory them in warehouses or distribution centers to await orders from dealers and owners.

Some of these parts would be wear items (brake pads, rotors, oil filters etc) and then others must be available in the event of breakage (plastic body parts, engine components etc....)

Anyone have detailed info as to how this system works at Honda or one the other major brands?
 
Excellent work! And it's nice to see the new and old pieces that metriculated this endeavor. I'm sure that once it wore down to the hole bottom, it went even faster.

I'm just as guilty to spend much more time than necessary to make a part versus just buy it...read 3D printing. But I enjoy the challenge, and as you note a little mental FEMA on the failed one usually prompts me to see how to improve the replacement. And if someone likes my solution enough to buy one, then all the better.

Once again, excellent work!
 
Should you have severe enough insomnia to wish to learn about supply chains, it's not at all surprising that these parts are common between Honda models and even manufacturers.

So many components are designed and manufactured by subsidiaries and contract suppliers that common parts shouldn't be a surprise. Japanese brake components are not made by Honda, or Suzuki, but by companies like Nissin and Tokico. And to a large degree, the motorcycle company doesn't design the brakes, they specify their requirements and Nissin or Tokico design the brakes. If you look carefully you see common design elements present on components on bikes from different manufacturers, like using a cylindrical bushing of a certain diameter with a hole bored in its side. That's the Nissin design they provide to multiple customers. The specifics like three piston calipers, with different pressure circuits, well that still a Nissin design, but to meet Honda's specs. Only Honda gets that design, no one else.
 
If you get a flash of lightning and remember what bike that clutch lever is from, let us know. I want to buy one for my ride.:)
1748026982200.png
 
Back
Top Bottom