Re-baking my ST1300 (Almost full redoing)

Greetings, Leonardo, congratulations! You're going to leave it looking like it came off the production line. I'd be grateful for all the wiring. You know, I'm hopeless when it comes to electrical work. This way, I can keep learning.

Veeeeeess ...
 
Greetings, Leonardo, congratulations! You're going to leave it looking like it came off the production line. I'd be grateful for all the wiring. You know, I'm hopeless when it comes to electrical work. This way, I can keep learning.

Veeeeeess ...

Today is the day I'm trying to make a good orientative piece of something so you can combat properly the fear to wired stuff.

THE NEEDED TOOLS.

- A happy-crappy multimeter. This one in the link is my best one, the precious jewel of my electronic measuring equipment. Notice the price. You don't need absurdly expensive equipment to do great things. In the real life I use something more like a 4€ one that I have to blow it up if I plug it the wrong way, that I got when I was 12 YO, and it has been working in three continens for more than 25 years, as I got it used. Around 20€.


- Some good electrician scissors, mine were 4 euros. A good wire peeling tool could be good for very small gauge wires, those are the hardest ones for peeling, scissors or blades can be bad for them, specially if you can't lose a piece of wire to try again because any reason. Mine are the cheapest one of this ones: Around 3€.


- Now a not so cheap one, a crimper tool for terminals. Mine is exactly this one, and works pretty good. You need it for crimping connectors. I made the big mistake of NOT buying it before. Really is worth the money and time you save. I "crimped" the terminals with other tools as pliers and stuff and soldering them. Completely bad option. You lose time and never is as good as using the proper tool: Around 23€.


- Then, some tool for dissasembling connectors. Al of them have a small moving plastic nail holding them in place. It's about knowing where to insert it and twist it so you disengage that nail and the wire will come out with the terminal, so you can do stuff there. It's useful when you have to get a wired derivation from other one that you have in a connector. You avoid cutting the wire by taking out the terminal, so you can solder the new wire and isolate it properly and then plug it back in place, if you don't want to use those plastic ones that can get a connection straight out from a wire by snapping the part there with the new wire inside (I don't like them). Around 3€.


- Now a soldering iron. I like them higher than 60W of power. Smaller than that will be bad for big gauges of wire or windy conditions. The smaller ones are for electronics, but we are talking big stuff here, and not that delicate stuff. Anyways a good one will have proper control of temperature, so you will have a good tool for smaller things too. I use 320 or 350 ºC for normal situations, up to 450 ºC for cold or windy times. Around 10€.


THE MATERIALS

You have different consumable stuff, like electrical tape, terminals, connectors, tin, etc.

Here is where I put my money on for real. Good materials is what you'll be using later in the device you want to fix. Better wait to get good stuff, if you can. In AliExpress you have plenty of qualities and prices. China is the industrial town of the world, and they don't care and will never care about knock-off stuff and piracy and so on. So you'll find products that are 80% of the quality for the 1/10th of the price in comparison with branded good ones. And sometimes is far enough for the work you need to do.

EG, I bought this shielded wire for fixing the knock sensors wiring of my ST1300, it's like double quality than the original one, the finishing is pretty good and the copper inside seems great. I'm just protecting from heat it a bit better than the original one and that's it, I'm having far better stuff than the original for not a high price at all. I used three times the gauge than the original, as ti will be better. Always use the same or higher gauge than the original if you can, not exceeding it too much neither. The small pieces of wiring at the connectors that you have to leave there will not affect too much as they will be very short. Putting better wiring will be almost always a good and noticeable thing to the group of conditions.


I'm showing now some of the materials I use frequently, so you have some references:


  • Heat-shrinking tubing:

  • Fabrik tape for INTERIOR wirings. Maybe not suitable for motorcycles as it will trap humidity. It's for grouping a lot of wires, not like electrical tape:

  • Heat-shrinking tubing WITH GLUE inside. This one is great, my favorite everytime. I don't use electrical tape for isolating wires, I use this thing:

  • I'm now testing this one, is a fabrik tubing heat-shrinking stuff. By now is going great, I like it a lot. You can see it at my fixing of the alternator wires repair. I used this product for protecting the couple wires it has:

  • Glass fiber fabrik tubing for protecting wires from heat:

  • Common ondulated plastic tubing for protecting wires from hits and scratches and so on. I use the open version, as the closed one is crazy useless for long wires and you have to break it if you need access to the wires for any reason:

  • Common copper closed terminals for big gauge wires, tinned or raw copper. These one are so big that I usually solder them after closing them with pliers, my crimper tool cannot bear it. Not biggie:

  • You have a lot of these anywhere, and you have the ones with the small nail for using them into plastic connectors or as they are without it. You can find different terminals for different connectors, you CAN change the terminals in the connectors and make them new. And you can find bags of hundred of them for just some coins of a price. You only need to look for them, that can be really exhausting because some times it requires a deep search:


NOW THE SCIENCE PART.

The damn workshop manual has the wiring diagram, for any vehicle. For ours I have the one attatched to this post in PDF format, AND the one into the workshop manual. You have different ones, but all of them should show the same information, more or less.

The wires always have references. Usually they are different color codes and at the connectors you'll have numbers that will tell you which one is what. You can trust them with good guarantees. Few times would be not the correct colors or not too similar just to be sure. The good thing about the wirings is that it's about a wire going from point A to point B, and the wiring diagram will tell you exactly where are those A and B points. Your task with wiring is that they connect those points properly, without short circuits or bad conductivity. That's it.

The things you must have in mind to get proper electric conductivity:

- You shall need clean connectors. I use WD40 for that, and even I clean them with a toothbrush and half a cup of gasoline if needed. Some people grease them but I think that's not necessary and it is messy. I choose to clean them from year to year (clean=spray WD40 to them and collect with a paper towel what gets out full of crappy juice, like 30 seconds task). A connector works properly when the metal part of a terminal scratches with some strenght the other terminal so raw metal contacts each other intimately. That's why you need it to be clean. But you need it to be properly bended too, so if you see loosey terminals, bend them in order to fix them and get those scratches that makes good conductivity.

- You shall need good wiring. Could sound weird, but copper loose properties with use, heat and oxidation. You'll notice soon, at a sight's hit, when the copper has gone bad. If you find this usually will be with a bad isolating layer too, as the plastic or rubber also goes bad for the same reasons. Change those if you find bad wirings, also humidity can go into cracks and full rust that copper or create short circuits.

- You shall need proper pairings. I don't know how you call the act of creating a union of two wires by some meanings, so I'm just calling it "pairing" wires. Pairing a wire to another is not just getting some copper visible and twisting them coppers under a couple layers of electrical tape. That can be OK for an emergency, but not for really getting things done properly. You'll need the same things said before: intimate connection between conductors and good isolation to avoid short circuits and corrosion. So you can just make a good knot there and bear the possible consequences or solder it after combing it for good. Then you should isolate it, I like the glue version of heat-shrinking tubing because it stops humidity to get into or stay inside the wirings. Also you can use those cheap clips that you close over two wirings, that has some metal teeth that connect both of them. These have no isolation for humidity.

- You shall not make a damn knotted net of your wirings. Do not mess them. Take notes, use your own color code for your wirings, you tell the measures, but take some. When installing an alarm or other devices that will have many wires I use plastic net tubing or ondulated plastic tubing for protecting the new wires I'm putting in, and my own color code for those, so I have some order. Wirings are a mess only when you are doing a messy work, and it can be horrendous to work when you don't know which wire is going to what a damn thing.

If you use zip ties or anything to grab wires, remember that those can also cut the wires with enough time. Leave them breathe. Do NOT tight them fully. Wires need to rest in peace but not tightly. Also remember that you will need to move them, twist them, if you have 40 wires inside a really tight electrical tape tubing you just made with a lot of force, you will not be able to bend it. Do not press wires, ever. Wires are intended to bend and if you try to force them you can break not only the isolator but the copper too. Copper is kinda soft of a metal.

Leave always an extra 5% or so of wiring over your guess of the measure. I can't stress this one enough. Learn to lose some wire when creating or fixing things. I know is sad when is new wire and you paid for it, but a bit more wire will always be better for working. And saving a couple of extra inches inside what you are fixing (as leaving a bit longer wire than just the exact size) will be really useful in the future if you need to cut and "pair" again that wire for any reason. With proper balance, this measure will save you a lot of hard headaches. I'm living it all the time, whenever I forgot to put those extra inches of wire I have to make even another mess to add an extra part, and some times is not as easy as soldering 10 cm of wire, or good for the work, as frequently there's not really enough space (specially inside tubings and boxes like the fuses one).

Another remarkable thing is that you have images in the workshop manual that show where the wires should go in the chasis. You have just to see it with a cup of coffee and some patience to know properly where you have to put your wiring. Just follow the manual, it's all in there (usually...).


If you have to make multiple "pairings" in some grouped wires...


---------------------------------you--------------------------------------------------------
--------------------------------don't--------------------------------------------------------
------------------------------do them all -------------------------------------------------
--------------------------
in the same spot-----------------------------------------------


---------you do-----------------------------------------------------------------------------
----------------------them in different----------------------------------------------------
------------------------------------------------ones so you keep------------------------
---------------------------------------------------------------------------the thing thin
----


Have in mind that twisting the copper before rolling it over the other wire makes a bigger union, but not a better connection. If you will solder it, do not twist it before. Put it as it is and roll it over the other wire, then solder it. You'll find a good connection for almost half the size, and that's noticeable when you have 20 of them inside a tubing that will go inside a jungle of engine parts. If you cannot solder it, "combing" it before rolling it over the other wire is mandatory if you want it not to unroll it by itself. It will be a stronger "pairing", but a common connection.

About the heat issue and the kind of wire, the problem with the heat is that weak the brass of the connectors, so they stop doing proper conduction as they stop applying pressure over the scratch they did when were connected. Also heat break the insulations, or make it brittle, and even it break the plastic connectors themselves, deforming them or weakening them. The heat is an issue, and you should have all the conditions your wires will be in. As heat, humidity, scratches, bendings and movements, sun, cold, even wind and bugs. I've had to fix wirings in vehicles because mice ate them, because they were not properly secured from rodents attacks.

About broken connectors, you have knock-offs on the internet. You can buy new ones or adapt somehow some glue so the terminal stays there after putting it in place. Even soldering it to its counterpart could be a (brutal but) appropiate measure.

About the kind of wire. You have different ones, as heat-resistant ones, signal ones (with shielding), very fat ones for high amperage or very thin ones for just information (signals). Chose the correct ones, there is a whole world of kind of wires. Try to match the one you are changing or get higher properties if you have reasons for it or not other options. Have in mind that if thinner the wire, the less Amps it can bear, so that's an issue. It can just get hotter (even dissolve the insulation) or just not work what you are trying to move. And the signal wires can have shielding (like the knock sensors in our ST1300. Not using a shielded (and properly connected shielding) wire can cause bad engine behaviour, as it will not be able to properly detect those knockings. The shielding transform interferences into discharges that go to the proper electronic components or to the chasis to absorb them. If a wire is shielded, surely it is for very weak signals that need protection in order to be clear for the computer processing them.


About the self-vulcanizating tape (I don't know if you have it with that name...)... It's a rubbery tape that is always self-soldering to itself. It's used for underwater "pairings". It's NOT good at all for motorcycles, forget completely about it for vehicles use. There are almost NO situation where it would be a good idea. First you put some of that tape, then some electrical tape over it, and if you don't do that last step the copper will get out and create short circuits. It's useless as with time the wires come out of it, that's why you must put electrical tape over it. Better just use electrical tape and that's all.

From here it's more about learning to fix connectors and solder new wires. That's it, some practice. You don't even need too much practice to learn, or some youtube videos can do the job of showing you how to do it. When you know from where and where is going a wire is not that bad and the fear or doubt dissapear, as it becomes just putting there a wire doing that simple task. It's a lot of work when you have 20 wires, but not a lot of knowledge, not more than the one inside the wiring diagram. It's not magic. What can be really a magic issue is when some kind of sensor is doing stupid things and you are not able to know what sensor is. But wirings? Nah, that it's just about having a tidy, clean and neat pack of wires raw touching the correct terminals.

You also have universal connectors packs in aliexpress or any of those stores that can save you when you find a really broken connector. You just replace it with a new one, or even two or three of them, as it's about connecting a wire to the correct counterpart.

I'm posting the fixing of the wires of my dear ST1300 these days ahead, as I received the shielded wire yesterday and I'm finishing the lower engine wiring, the worst one I had to fix.

Please be free to ask, comment, disagree, whatever you like about this, I love the wires stuff. I hope this is useful and if you can suggest improvements I'm already grateful for it.

Vsssssssss
 

Attachments

  • Wiring Schematic - R7 - ST1300.pdf
    372.2 KB · Views: 8
Last edited:
I just edited some things in the previous post. I'm doing some progress, I'm putting pictures soon I hope.
 
YEEEEEHAWWWWWW!!!!!!! I FOUND ITTTTT!!!!!!
I just found the knock sensor connector!!!!!!!
Is this one:


Mine are extremely brittle, just like candy, and I cannot use them at all!!! I'm on the clouds of happiness right now!! I really didn't want to make some Afrikan invention to solve it. I just can put new ones!!!
 
This is it. I'm full redoing the low engine harness completely, with connectors and everything, using better and special wires so they bear the heat with no issue at all for the next 50 years.

This is the main connector of that harness, the most damaged wiring I've seen in my entire life in a vehicle, motorcycle or car or van or anything:

 
Greetings, what a great class! I really, really appreciate it. This will help me overhaul the electrical system of an old motorcycle I have in no time, and it's probably not half as difficult as the ST 1300. I'll keep all the links safe. Thank you very much.
SSSSSSSSSSSSSSSSSSSSSSSSSSSSS....
 
Greetings, what a great class! I really, really appreciate it. This will help me overhaul the electrical system of an old motorcycle I have in no time, and it's probably not half as difficult as the ST 1300. I'll keep all the links safe. Thank you very much.
SSSSSSSSSSSSSSSSSSSSSSSSSSSSS....

I'm glad if it's useful. Hope the pictures and process still to come that I'll put here is useful too. I'm not documenting or doing the harness yet, I have to wait for the parts.

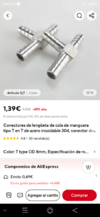
About other stuff, I'm starting to get into the cooling system. I'm checking parts and hoses and so on, and I just found a small plastic "T" of two 6mm and one 8 mm connections that I was sure it was a good idea to discard and put a stainless steel one. The moment I took the hoses out (carefully) one of the connections broke. I know it! It was "caramelized" (as it was brittle as caramel), just like the electrical connectors.

So I'm buying these down here to adapt the thing, it's stainless steel, pretty sure way better than the original one made in plastic:


I DO NOT RECOMMEND to use the brass ones, I've seen weird corrosion on them after some use with coolant. Weirdly brass is not as good as it seems. Is sensitive to water with very low hardness and acids and other things that, strangely, can dissolve it. So I'm going with SS as it is not that expensive, having in mind that I'm only buying this part.
 
Last edited:
no link found
361x360.png

Sorry, the page you requested can not be
 

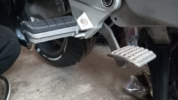
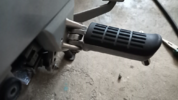
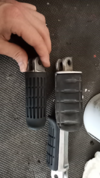
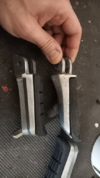
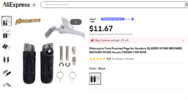
Just arrived the footrests I ordered in AliExpress. They were 7 euros, supposedly for a Honda CBR. They are a PERFECT FIT for our ST1300. As you could see mine were really in bad shape, also I only had ONE, so I needed for sure new footrests. It was (and still is, as I have to see if they can bear the weight) a risky bet, for now I'm amazed with the product. Clearly not original, clearly a viable option so far by now. No doubt better than having only one of them...


1747741308152.png


1747741323283.png


1747741341030.png

1747741365297.png


1747741378573.png

1747741398555.png
 
Yeah, I was thinking the same. It surprises me that didn't redirected to the correct one instead of showing an error.

Routing through a Spanish VPN server, the item is displayed for about half a second, then switches over to "Esta pagina no existe", probably once the VPN set up is detected.

But searching for "Honda CBR footrest" from the US returns this:

1747752418336.png

It looks like we would need the item description to be able to track them from here.

I'll have that in mind from now on, so you can see what I'm using.

That one you show was an option I was considering, but I liked more the ones I have now. You have a couple more designs I think that may fit our ST1300.
 
Hello mates.

I'm doing great improvements in the long way of resuciting this beast. Sadly I didn't have time to show you the thing these days back, I'm fully commited to bear whatever wasting of time in order to get it done over anything else. I hope these days ahead I can put some good post about it.

A couple days ago I have the nice religious experience of hearing it roar for the very first time, as I never saw the engine running before. It was amazing to start it and see it alive.

At this point is the thing to properly sync the throttle bodies. I remember seeing here a really good post about it for stop the bike from getting too hot by fixing that sync, I even think it was in this thread, but I can't find it anywhere.

Does anyone have that link to that procedure? Could you please share (share it again...) here please?

Thank you in advance.

I made good progress in some nice stuff. The wiring is now pretty nice, I achieved to copy myself a couple keys for 10€ (as I had only one), and other interesting stuff.

Also I've sinned badly, as I dissasembled some parts of the throttle body that I shouldn't but noticed too late, so after just a little mistake, I went full gorilla and eviscerated all the throttle body around everywhere in the room, reason enough for you to want to hit me, I know. I also know how to calibrate them again BUT I'm sure you can have really nice ideas or better procedures than mine, so I'll appreciate if you share those here for everyone or the links for those procedures.

In the otter paw I can say that the thing was nasty, it was for sure needing a good rework anyways, I'm sure it will work better than before, despite the "mistake" and having to calibrate it again. Also, for those thinking about the molibdenum coating and the teflon paint or whatever was that, all was completely destroyed and not working anymore. Anyways I left there the remainings of those glorious details, as I didn't scraped the thing even it was clearly destroyed.
 
Last edited:
Does anyone have that link to that procedure? Could you please share (share it again...) here please?

 
Back
Top Bottom