2007 ST1300 fork oil lock piece bolt (help!)

Joined
Nov 3, 2008
Messages
254
Location
san diego, ca
Bike
'07 ST1300
I've seen the threads. I tried an impact driver, then a 1/2 breaker bar, which I discontinued use immediately when the corners of the bolt started to dimple. Then a 1500W heat gun, more and more heat until it maxed out at 250f at the bolt and still wouldn't budge. It's not spinning at all. I have a 2 gal compressor that goes to 125, maybe good for a shot or two with a cheap gun. Good idea or bad idea? Options? Thanks!
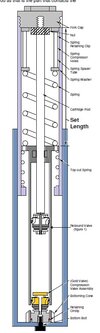
Many, many years ago I had a local dealer install Racetech gold valves. They handed it off to a rookie, I assume, because the forks were assembled without a washer between the spring and spacer on each fork. That and a personal phone call asking how I would rate the service tech. I said no comment. So there's that.
 
Oooo... I feel your pain.

Should it come to it, do you have the means of holding the tube and drilling the heads off the bolt?

Could do it handheld, but I'd personally be happier if I could hild it in a vise and use a machine tool like a mill, lathe or last resort, a drill press.

Detach the bolt head, pull the internals and show the stub who's boss.
 
Thank you STRider. I'm going to try an air gun and if it strips that's what I'll do. I've ordered 2 new oil lock pieces and bolts in preparation.
 
Take a flat punch a bit larger than the bolt. Hit it hard a few time till the socket has to be hit on. This does 2 things, expands the bolt so it has less of a chance to round off and it may jar the threads loose. I hope your not using a 12 point socket.
 
Or someone decided to apply Loctite...
Red loctite - the sort of permanent stuff. The manual says to use a "locking agent". Does not say which one.

I like @STRider's suggestion to use a mill, but I've not seen a milling machine that will grab a long fork piece and allow you to remove the head of that bolt in the vertical position. I'll amend that, many mills allow you to turn the headstock so the bit is moving horizontally, but this would require a fully equipped machine shop - v blocks, hold downs, etc, not to mention the work to set up the mill. Removing the screw's head would not require more accuracy than provided by the indexing marks on the headstock, but after you are finished, someone would have to tram the mill, not a trivial task for someone unschooled in the procedure. This is not a big deal, but it can be tedious.
 
Take a flat punch a bit larger than the bolt. Hit it hard a few time till the socket has to be hit on. This does 2 things, expands the bolt so it has less of a chance to round off and it may jar the threads loose. I hope your not using a 12 point socket.
I remember that bolt being an allen head - it doesn't take a socket. Whacking it as you suggested might close down the hex opening and achieve the same result.
 
Keep in mind that if it is seized because of loctite, once that bolt loosens, your pain is just going to magnify because then the bolt is just going to spin and you'll have no way of holding the inner piece. It will be tough to drill as well as the parts will spin with the drill bit. If you're ordering two new bolts, It might be worth considering just drilling the old ones out without loosening them. I believe they're a 6 mm Allen head bolt which would make drilling them out simple... The drill bit will self-center. :twocents1:
 
That may be the new plan. I need some new bits anyway.
(edit) ok, just did a test, it drills easy. I’ll wait for the new parts and continue. Thank you Bmacleod!
 
Last edited:
That may be the new plan. I need some new bits anyway.
(edit) ok, just did a test, it drills easy. I’ll wait for the new parts and continue. Thank you Bmacleod!
I've never had to do this on any bike I've owned, so I'm curious. If it was Loctited, then once you drill the head off how hard is it to grab the shaft of the bolt with something like vise-grips and turn it out of the threads after separating the fork pieces? Does that usually work, or do you have to cut the bolt off relatively flush and drill out the last remains of the bolt and chase the threads?
 
I don't have huge experience but of all the Honda forks that I have disassembled, I have had a couple of instances where the damper base in the cartridge would spin and prevent the bolt being loosened. For the bolt to be stuck so tightly that the head could strip suggests LOTS of red threadlock has been used.

Once the head of the bolt is removed I would expect you will be left with a stub that is probably 5-8mm in length which will be the thickness of the fork casting and the washer. Once the cartridge is out of the fork you can if needed remove the damper base by pushing it into the cartridge to expose the retaining circlip and then pulling it right out of the cartridge tube (will be some resistance from the o-ring). You can then put that assembly in a vise while extracting the bolt.
 
Thanks TerryS, that’s helpful. I didn’t know about the circlip. I will have new parts and toss the old. Hopefully blue medium Loctite is ok for this application.
 
One other thing to remember when applying heat to soften the thread lock.

The fastener is not threaded into the fork leg/slider, but the damper assembly inside the leg, whether it's a cartridge design like that on the 1300 or a damper tube like the 1100.

So the heat applied to the slider has to conduct through it's mass and then into the damper assembly. Which unfortunately can mean applying an uncomfortable amount of heat to the leg.

I haven't had the need to disassemble the leg from a 1300 yet, but for others I've done with old-school dampers, it helps to begin loosening that fastener with the fork fully assembled to take advantage of the spring pressure to inhibit the damper from rotating against the turning wrench.

Our VStrom needed fork seals replaced and I had the same problem getting the that damper retaining bolt out. There's a tool Suzuki specifies in their service manual that looks like a serrated cone you attach to the end of a T-handle or 3/8" square drive extension. You insert it into the fork tube and wedge it into the top of the damper rod to keep it from turning while wrenching on the retaining bolt. I gave up and took the fork legs to my nearby mechanic to do the dirty work. Not sure what different tools he brought to bear on the task though. I don't think this tool would be useful or appropriate for the 1300 though.
 
There's nothing other than friction stopping the damper base from spinning if it so desires. It is a completely circular object inside a tube, with a sealing o-ring between, and of course it is nicely lubricated with fork oil. From the outside of the fork the only things you can reach are the damper shaft and if you had a long hollow tube, you can reach the top of the damper cartridge. Pushing on the cartridge won't do much but that is effectively what the spring does when the fork is assembled, and that is usually enough friction to stop the cartridge base spinning. If you really get stuck, the best option is to pull up hard on the damper rod, that pulls up on the cartridge and applies some force to the damper base via the retaining circlip. In conjunction with heat and a rattle gun that will give some hope of unscrewing the damper bolt. The diagram below (from a Racetech installation guide) gives you some idea of how the fork/damper is assembled.
 

Attachments

  • fork.jpg
    fork.jpg
    60.2 KB · Views: 3
Back
Top Bottom