Handlebar Accessory Question

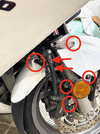
These projects are a lot like planning a trip. You know the destination and you plan the route and you undertake it all carefully and methodically. That is until the first leg of the journey calls for the simple removal of the front fender and you are confronted with linked brake hardware and ABS stuff. I proceed with caution.
 
You probably sorted it by now, but I enjoyed making this. Always wise to support the calipers with out the brake lines doing the work. Bungee up to the triple or the like.
The brake lines won't be detached, just the fasteners to the fork. Putting a wood shim in between the pad and rotor will help with removal. Keeping them (shims) in while doing your maintenance will ease in installing. Hope this helps.


IMG_0421.png
IMG_0420.png
 
Last edited:
You probably sorted it by now, but I enjoyed making this. Always wise to support the calipers with out the brake lines doing the work. Bungee up to the triple or the like.
The brake lines won't be detached, just the fasteners to the fork. Putting a wood shim in between the pad and rotor will help with removal. Keeping them (shims) in while doing your maintenance will ease in installing. Hope this helps.


IMG_0421.png
IMG_0420.png
You are correct, I did manage to get it out but I really appreciate the pictures because it has to go back together again and I am not sure I am smart enough to remember how it goes! Last night I was just sitting looking at it and it came to me that the front wheel needs to come out. I guess I skipped that step in the front fork disassembly instructions. I also found the 8mm bolts that are black on black and well hidden so that helped. I hope the front fender removal is the hardest part of the process but that's just wishful thinking.
 

Just saves having to remove the bars and risers to get at the caps.

Ahhhh, I see.

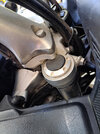
Not having done fork service yet on the 1300 I can see why you might do this. And me lacking the slick 2x4 jig @SMSW has (which I will now make for myself!) I've always used the clamps for holding the fork leg when replacing the caps and compressing the springs. In that circumstance *I* need the tops exposed for reassembly, though maybe not for disassembly using your technique of sliding the tube down to access the cap without removing the bars and/or riser.

If course this won't work for those high performance fork tubes which turn the diameter down between the clamping surfaces for weight savings.
I just slipped the left fork out. I removed the cap with a suitable sized bolt head (turned round and the threaded end held with a vice-grip) and I have set the whole thing to drain, Tomorrow I will purchase a long reach "6 metric Allen wrench socket and finish the tear down, clean up and reassembly. It all looks pretty straight forward but at my age it's the getting up and down and crawling around on the floor that's the real trouble.
 
I just slipped the left fork out. I removed the cap with a suitable sized bolt head (turned round and the threaded end held with a vice-grip) and I have set the whole thing to drain, Tomorrow I will purchase a long reach "6 metric Allen wrench socket and finish the tear down, clean up and reassembly. It all looks pretty straight forward but at my age it's the getting up and down and crawling around on the floor that's the real trouble.
An impact wrench makes removing that bottom bolt easy. Some guys have had a hard time getting it out, most do not. When you reinstall the front wheel, do not reverse those two spacers. I put a little dab of red paint on the right one - boater's saying, red right returning. People have installed the spacers improperly and wondered why the brake pads drag. Be careful not to over tighten the pinch bolts at the bottom of the fork. I think I read somewhere that this can break off the bottom of the fork.
 
... I put a little dab of red paint on the right one - boater's saying, red right returning. ...

When I was fabricating the spacers to install 650 VStrom knuckle guards on my 1300, I decided a 3D printed shell around the aluminum spacer was fine and had one of my robotics kids design one in Solidworks and print it for me. The first test print was green and was perfect. The next one I printed was red. I briefly considered reprinting two in black.

Then it hit me, the red one goes on the right and the green on the left!

My saddlebag key-knobs are not perfectly interchangeable (yeah, my fault) so they're marked with red and green paint too. :)
 
An impact wrench makes removing that bottom bolt easy. Some guys have had a hard time getting it out, most do not.
I'm not sure how an impact wrench works with a hex socket. I don't know, I never tried - I just didn't think that it would add any extra grip.

I had problems getting my bolts out - I felt the hex driver start to slip and stopped turning.

I resorted to pans of boiling water to heat up the bottom part of the fork leg. The thread locking agent turns to chewing gum when it gets hot.

And also - a tip from Larry which I didn't know about. Apply the force necessary without it feeling as though the bolt hex socket is giving way and keep that same pressure maintained. Don't increase it. It's really odd - it feels as though nothing is happening - but after a short while the bolt will succumb to the constant pressure. It just suddenly yields. Magic.
 
An impact wrench makes removing that bottom bolt easy. Some guys have had a hard time getting it out, most do not. When you reinstall the front wheel, do not reverse those two spacers. I put a little dab of red paint on the right one - boater's saying, red right returning. People have installed the spacers improperly and wondered why the brake pads drag. Be careful not to over tighten the pinch bolts at the bottom of the fork. I think I read somewhere that this can break off the bottom of the fork.
Yep, Back when I rebuilt older Triumph forks we would install the fork leg, put the allen screw in the bottom of the leg, pore in the right amount of oil into the slider, cram it on and spin the allen with the rattle gun (the small one of course,) The screw would keep the oi; from leaking out and it save all the pain of filling the oil past the spring.

Having a little trouble getting the seal to fully seat so I can get the locking ring/tab/spring to seat.
 
My internals didn't turn ! I was thinking that the hex driver would attempt to spin in the hex socket.

I don't think that anyone has posted the link to Michael's excellent fork service post - if you are tempted to go that far.
 
Well the right leg is done and back in. I used a 16oz 10wt fork oil and half (it seems) of another one. My notes say to fill to 2.4 inches to the top of the tube and that's a lot of oil but quite a bit came out, Yes, I pumped the damper dry and pumped it full again on refill.

Oh. . . and I found a #6 Allen key and was able to break both of the base screws lose with the help of a large adjustable spanner.

The weird bit is the right side was not leaking. I got the parts and I did both. The right side oil looked red and newish. The left side oil is yellow and very dirty. It is as if the right side seal had been serviced but the left side was possibly OEM. Even the pinch bolts on the triple clamp was tighter on the left side than on the right. It makes me wonder why anyone would go to the trouble to do one side and not the other?

I replaced the bushings. The bike only shows 36,000 miles but the top slide bushings were pretty worn.
My internals didn't turn ! I was thinking that the hex driver would attempt to spin in the hex socket.

I don't think that anyone has posted the link to Michael's excellent fork service post - if you are tempted to go that far.
I did post it a while back but my link was buried in my text. This is a great resource and I studied it like a freshman cramming for final. I even took notes on torque values, volumes, parts and procedures. My biggest issue was the handle bar set backs and the front fender removal. I am more spooked about reinstalling the fender than I am with building the forks.
 
My internals didn't turn ! I was thinking that the hex driver would attempt to spin in the hex socket.
John, my hex drivers - aka allen wrenches - all fit into a tight 3/8" drive socket that snaps onto my ratchet, flex drive handle, or square drive adapter for my cordless hammer drill. Each size has it's own base and there is no slop. So far I've not broken any or had any problems with them. I use both Snap-On (high quality brand bought many years ago) and Harbor Fright (real cheap tools made in China).
 
Yes, I have 3/8" drive Allen wrenches in a quality tool set. It is the 5mm sockets that seem to be the worse - like the one at the bottom of the forks and the Pad pins on earlier ST1300s and the rear caliper of all STs . I reckon 18Nm is too much for that pin - I had a couple of issues when the socket just gave way like cheese. I stoped tightening them to 18Nm and started doing it by feel. Then when the 2008 ST1300 came out, I modified their hex head pad pins to fit the rear caliper.

Maybe time to look at my 5mm allen driver in my tool kit - see if there is an issue there, and try other makes.
My wife and I both ride ST1300’s and just got back from a 1740 mile, 9 day ride all around West Virginia. My left fork started leaking about 1/2 way into the trip. Rebuilding both forks today. Waiting for parts to get here. I have to say, these forks were easier than others I’ve done in the past.
 

Attachments

  • IMG_4948.jpeg
    IMG_4948.jpeg
    222 KB · Views: 5
I am back together and MAN! The front end is stiff. I knew it was going to be a little stiff from just working each fork but I had no idea.

Did I screw up when I used 10wt fork oil? That's what it called for and it took one 16 oz bottle and the better part of another one to fill one leg. I don't think I have it over full since I went by the book and filled it to 2.4 inches from the top of the tube

(Note) I think the forks have to come back out. I am pretty sure I over filled them taking the measurement of the fluid with the spring and spacer in and the fork extended. Live and learn. . .sigh
 
Last edited:
Back
Top Bottom