
PopJack
Die young, after a long life.
Changing the Air Filter on my ST1300
I noticed a thread about changing the air filter on a ST1300 and mine needed changing, so I documented what I did. Hope it helps.
Note: Bolt sizes mentioned refer to the NEEDED WRENCH- not the shaft size of the bolt.
Step 1: Get Ready
The filter is not hard to change, but not as easy as on a cage. I try and run the fuel tank down some- it doesn't have to be empty, but I've never tried it with more than ? tank.
To do the job, I used:
10mm socket with 3" extension
10mm combination wrench
8 mm socket on 10" extension
Phillips head screwdriver
New filter.
You may note that this time I used a K&N brand filter. Last time I used an OEM filter. I keep hearing that the K&N will give me more power, better gas mileage and help fill in my bald spot- we'll see. I'm going to be curious before becoming critical.
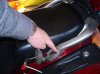
Step 2: Remove the Seat
Step 3: Put the forward seat adjuster in the maintenance position- all the way out of the way.
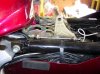
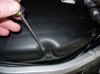
Step 4: Loosen the tank bolt on the back side of the tank (10mm.) I use a socket on one side and a combination wrench on the other. Do not remove this bolt, but get it very loose.
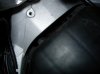
Step 5: Remove the two bolts at the front of the tank (8mm).
Note the bushings (actually called a "setting collar"). These are easy to drop, so I take mine out and put them somewhere. (Actually I do now…. )
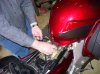
Step 6: Lift the front of the tank and with a rocking motion, slide the tank backwards. Lift the front of the tank as far as the strap will allow it to go. If it hits the handlebars or controls, you need to slide the tank farther back. NOTE: I have risers on my bike. The first time I did this I was afraid the risers would keep the tank from coming up. The tank WILL clear the bars even with the risers if you slide it all the way back. (At least on mine).
There is a special rod under the seat designed to prop the tank up and it works well.
For some reason, however, I got in the habit of running a bungee cord from the front of the tank to one of the hand grips in the back. This holds the tank up and the static/ retention strap keeps the tank from lifting too far. I like the bungee cords because the rod gets in my way. You can see one end of the bungee cord in the photo above. It is plastic coated, so it won't hurt the paint.
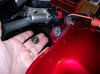
Step 7: I removed the white sensor plug and get the wire out of the way. Some people do not. I leave the grounding strap/ tether in place- some people remove it. One well respected friend of mine removes the entire tank so that he can get to things easier- I don't.
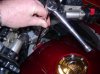
Step 8: Remove the screws around the perimeter of the air box.
Note that I leave the front two in their holes- I get them loose in their holes, but I do not try and remove them.
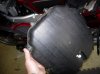
When the rest of the screws are gone, I just lift the air box top clear and set it aside.
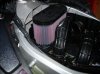
View of the air box with the top removed.
Step 9: Remove the old air filter- and clean up any debris you find. I have found a variety of interesting bugs- some of which escaped the air cleaner and were in the box.
Step 10:
I run a thin film of lithium grease around the base of the new air filter before I install it. This is not in the shop manual, and I don't know how many people do it. I apply the grease thinking it will help the new filter seal better. I can't figure out why it would hurt and it seems to make sense.
Put it back together by carefully placing the lid back in place. I leave the two screws in the front in place. Be careful of the rest of them- they love to be dropped.
Plug the sensor back in, put the tank down and replace the collars and the bolts.
I sometimes have a time getting the front of the tank to line up with the threaded holes. I find a small allen wrench or similar tool can be used to help persuade cooperation.
Tighten the bolt in back, put the seat bracket back where you want it, replace the seats and GO RIDE!
Attachments
-
 remove seat.jpg44.1 KB · Views: 826
 -
 SErvice Position.jpg45.9 KB · Views: 1,045
 -
 Tank Bolt.jpg46.3 KB · Views: 955
 -
 front bolts.jpg52.8 KB · Views: 833
 -
 screws.jpg40.8 KB · Views: 797
 -
 evil screws.jpg40.1 KB · Views: 758
 -
 boxtop.jpg40.5 KB · Views: 764
 -
 bushing.jpg48.2 KB · Views: 986
 -
 exposed box.jpg41.7 KB · Views: 1,179
 -
 readytogo.jpg44.5 KB · Views: 930
Last edited by a moderator:


