
Shuey
Site Supporter
I had a cell (probably) going out in my Yuasa battery . . . no shame as it'd been drained a couple of times. I was surprised it lasted this long. So, I called our friend Tim at Keel Brothers (I had to look up Two Brothers new business name) who recommended a Ballistic EVO2 12-cell Lithium Ferrous battery replacement. He noted it was a little smaller than STock and A LOT LIGHTER, and recommending I just use the packing foam that comes with it to fill in the extra space. Battery ordered and received a day and a half later.
So, today was the day and this is how the install went . . .
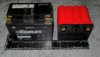
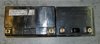
First, here's the new Ballistic 12 cell battery. If the specs are right, it's going to be a great choice: 410CCA, doesn't need maintenance charging when your not riding for awhile as it loses less than 10% of it's total charge over a 12 month period of inactivity, it's compatible with our ST charging systems and chargers (the only caveat being don't use a charger that desulficates), it is a lot lighter and somewhat smaller.

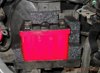
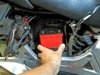
OK, have a new battery (seems like a toy or display fake - really), remove the Yuasa.

Let's just set this puppy in there and see what we've got. We do have a little space.

Let's compare the old and the new. Length: Yuasa about 5 7/8", Ballistic 4 7/16" leaving about 1 7/16" of space to fill.

Width/Depth . . . they're the same. No adjustment needed here.

Height at the back of the battery: Yuasa 4 5/16", Ballistic 3 3/4". Gonn'a need about 1/2" of something to fill in at the top.

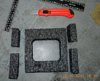
So, to fill in the empty space, I used the pliable packing form that the Ballistic battery arrived in, a box cutter and a ruler.

Being the detail oriented person that I am, I played around for a little while taking copious measurements of everything then adjusting them to account for the compressibility of the foam, then was poised to make my first cut . . . hey, dummy (I said to myself, not you) it'll compress, give it an extra 1/8" or so and just cut it. I cut a 7/8" strip off each end of the foam, then cut a 3 1/2 inch length from each one of them for the bottom filler on both ends of the battery.

So, here's the battery installed with the foam in place. One of the shorter pieces went on top of the longer one on the left side and the other short piece went on top towards the back of the battery under where the battery clamp will rest.

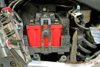
OK, here it is clamped in. All snug . . . not going anywhere.

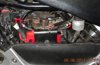
At first glance the plastic piece that fits over the battery covered the battery terminals . . . guess I'll have to cut them back a little. Hmmmm, the new battery isn't as tall, maybe . . . yep, all the wires (and I have an extra one or two) bolted onto the battery just fine, using the new bolts provided, and fit comfortably under the plastic cover. All done but putting on the outside panel. Easy breezy.

Any questions, let me know.
Shuey
So, today was the day and this is how the install went . . .
First, here's the new Ballistic 12 cell battery. If the specs are right, it's going to be a great choice: 410CCA, doesn't need maintenance charging when your not riding for awhile as it loses less than 10% of it's total charge over a 12 month period of inactivity, it's compatible with our ST charging systems and chargers (the only caveat being don't use a charger that desulficates), it is a lot lighter and somewhat smaller.
OK, have a new battery (seems like a toy or display fake - really), remove the Yuasa.
Let's just set this puppy in there and see what we've got. We do have a little space.
Let's compare the old and the new. Length: Yuasa about 5 7/8", Ballistic 4 7/16" leaving about 1 7/16" of space to fill.
Width/Depth . . . they're the same. No adjustment needed here.
Height at the back of the battery: Yuasa 4 5/16", Ballistic 3 3/4". Gonn'a need about 1/2" of something to fill in at the top.
So, to fill in the empty space, I used the pliable packing form that the Ballistic battery arrived in, a box cutter and a ruler.
Being the detail oriented person that I am, I played around for a little while taking copious measurements of everything then adjusting them to account for the compressibility of the foam, then was poised to make my first cut . . . hey, dummy (I said to myself, not you) it'll compress, give it an extra 1/8" or so and just cut it. I cut a 7/8" strip off each end of the foam, then cut a 3 1/2 inch length from each one of them for the bottom filler on both ends of the battery.
So, here's the battery installed with the foam in place. One of the shorter pieces went on top of the longer one on the left side and the other short piece went on top towards the back of the battery under where the battery clamp will rest.
OK, here it is clamped in. All snug . . . not going anywhere.
At first glance the plastic piece that fits over the battery covered the battery terminals . . . guess I'll have to cut them back a little. Hmmmm, the new battery isn't as tall, maybe . . . yep, all the wires (and I have an extra one or two) bolted onto the battery just fine, using the new bolts provided, and fit comfortably under the plastic cover. All done but putting on the outside panel. Easy breezy.
Any questions, let me know.
Shuey
Attachments
-
 Clamped In.JPG231.7 KB · Views: 66
 -
 Foam Cut.JPG285.9 KB · Views: 59
 -
 Height Compare.JPG302.6 KB · Views: 55
 -
 Install Complete.JPG231.6 KB · Views: 61
 -
 Length Compare.JPG152 KB · Views: 59
 -
 Materials.JPG180.3 KB · Views: 59
 -
 New Ballastics 12 Cell.JPG141.8 KB · Views: 56
 -
 Placed with foam.JPG262.2 KB · Views: 58
 -
 Remove YUSA.JPG169.1 KB · Views: 59
 -
 Try It Out, shorter.JPG208.8 KB · Views: 58
 -
 Width Compare.JPG124.5 KB · Views: 58
Last edited by a moderator:
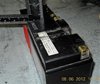
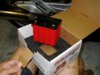
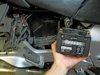
") Flashing Red indicates less than acceptable voltage (I forget the exact number) which was my first indication my YUSA batter had at least one bad cell and needed replacing.
Flashing Red indicates less than acceptable voltage (I forget the exact number) which was my first indication my YUSA batter had at least one bad cell and needed replacing.