
Odyssey PC545 Battery Installation using the HBH ST1300P Mounting Kit
I've experienced two Yuasa battery shortcomings, and without going into the details about those, I decided I would go the extra mile, and install an Odyssey PC545 battery. This is the same battery which a few police forces have opted to install in their ST1300P motorcycles because of the electrical demands placed on their machines from various lights and sound-makers which are not standard equipment on regular ST1300 models.
NOTE - Because all ST1300P bikes are equipped with ABS, the HBH mounting kit is designed to fit only ABS equipped ST1300 models. The HBH battery strap gets bolted to the rear ABS modulator. I am not familiar with the non-ABS bikes, and cannot say whether or not an attachment point could be easily fabricated, though I imagine it couldn't be too difficult. The photos below may provide enough information for owners of non-ABS models to draw their own conclusions.
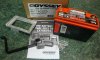
This first photo below shows the two-piece mounting kit I purchased from HBH (HBH = Huntington Beach Honda) on the left, and the Odyssey PC545 I purchased from BatteriesPlus in Newport News, VA. Call Cameron Hunter of HBH at 714-842-5533 or find them online at www.hbhonda.com part number 1300-BATT, if you wish to obtain this mounting kit. To the best of my knowledge, HBH is the only source for them.

The HBH battery tray is a welded aluminum piece which had a sanded finish. The steel retaining strap arrived with a black painted finish. The HBH pieces displayed quality workmanship, fit, form, and function. EDIT TO ADD: The HBH kit arrived with no instructions whatsoever.
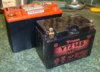
Here's a photo that may give some idea to the size difference between the Yuasa and Odyssey. Depth is about the same, but the Odyssey is a bit taller, and quite a bit longer.

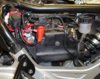
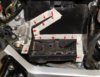
This next photo shows my OEM battery location before I removed the Yuasa. There are three wiring items shown here which are not stock. First are the two wires within the corrugated loom cover on the left which lead to an accessory fuse block located in the rear of the bike. Second is the Battery Tender harness with the plug connection tie-wrapped to the OEM battery cover in the lower-right corner. And third is an extra ground cable running from the battery to the chassis beneath the saddle.

After disconnecting and removing the Yuasa battery, the next step is to remove the steel bracket from beneath the OEM battery box. This bracket supports the weight of the battery while the plastic box does little more than restrict longitudinal and transverse movement, and provide splash protection from the rear tire. The machine screw in the bottom of OEM battery box requires a 5mm Allen? wrench while a 10mm socket will loosen the two bolts from the inboard side of the bracket. No fasteners were provided with the HBH kit, so the two OEM bracket bolts will be used to attach the HBH battery tray.

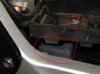
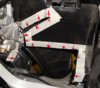
After the OEM support bracket is removed, the HBH battery tray can be temporarily bolted in place. With the HBH tray in position, layout lines were eye-balled and transferred to the OEM battery box for trimming. In the following photo, the HBH tray has already been removed, and the masking tape I used to layout my cutting lines (red arrows) remains.

Most of the trimming was accomplished with a 32-TPI hacksaw blade held in a gloved hand, and some of the cuts were done with tin-snips. After the "first round" of trimming, the HBH tray was reinstalled for test fitting the Odyssey battery. Note that one must recycle the OEM bracket bolts in order to mount this tray.

A "second round" of trimming saw this section of the OEM battery box falling to the tin-snips.

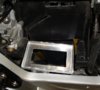
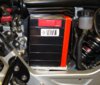
The Odyssey has landed. Note that the PC545 is installed with the negative (ground) terminal to the bottom. The terminal is uncomfortably close to the aluminum mounting tray to allow positioning the positive terminal at the bottom.

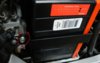
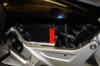
The photo below shows another fastener being recycled. This bolt came from the OEM battery strap, and is being used again for strap-duty. The bolt attaches the HBH battery strap to an unused tapped hole in the rear ABS brake modulator. Yes, that means the strap fits only ABS-equipped models of the ST1300. Owners of non-ABS models may be able to fabricate a different attachment point.

The second attachment requires that the installer drill a hole in the OEM battery box, and provide his own fastener. I used a 6mm x 35mm long bolt, a fender-washer on the plastic side, a standard flat washer on the near side against the steel strap, a standard 6mm nut, and a self-locking 6mm nut ... all made of stainless steel.
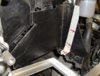
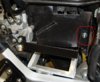
After trimming the OEM battery tray, it becomes evident that a considerable amount of road wash and debris would have instant access to the battery area from the rear tire. A piece of sheet rubber (this piece is 3/32" thick) was fitted with a single pop-rivet to serve as a splash screen, and hopefully keep debris collection to a minimum.

Fitting, trimming, and physically mounting the battery in its new tray was relatively easy in comparison to the electrical work I encountered. Ground cables did not need to be lengthened, but getting them attached to the battery with an Allen? head machine screw was testing my patience. I eventually cut a longer 6mm bolt and used the threaded portion as a stud which was securely installed in the battery's negative terminal. Then it was fairly easy to attach cables using a nut, which in turn was secured with a self-locking nut ... once again, all made of stainless steel.
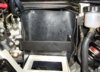
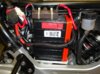
The positive cable needed to be longer than the OEM harness would allow. I had anticipated this, and purchased a length of small battery cable before the installation began. Dis-assembling the Honda cable connectors brought a pleasant surprise ... they were soldered. And though it made for more work to get them apart, I appreciate that connection method over a simple crimped connection. Likewise, when I assembled the longer harness, I also soldered the connections. I had to use a small torch for soldering because the connectors had too much mass for my electric soldering gun to be effective. Here's a photo roughly illustrating my final wiring arrangement, though it lacks the Battery Tender harness which was installed later.

Here's a shot of the final installation, and the Battery Tender connection can be seen tie-wrapped to the feed tube between the rear brake reservoir and rear master brake cylinder. Time for a test ride!

I hope this information helps those who would otherwise skip the chance to install the Odyssey.
I've experienced two Yuasa battery shortcomings, and without going into the details about those, I decided I would go the extra mile, and install an Odyssey PC545 battery. This is the same battery which a few police forces have opted to install in their ST1300P motorcycles because of the electrical demands placed on their machines from various lights and sound-makers which are not standard equipment on regular ST1300 models.
NOTE - Because all ST1300P bikes are equipped with ABS, the HBH mounting kit is designed to fit only ABS equipped ST1300 models. The HBH battery strap gets bolted to the rear ABS modulator. I am not familiar with the non-ABS bikes, and cannot say whether or not an attachment point could be easily fabricated, though I imagine it couldn't be too difficult. The photos below may provide enough information for owners of non-ABS models to draw their own conclusions.
This first photo below shows the two-piece mounting kit I purchased from HBH (HBH = Huntington Beach Honda) on the left, and the Odyssey PC545 I purchased from BatteriesPlus in Newport News, VA. Call Cameron Hunter of HBH at 714-842-5533 or find them online at www.hbhonda.com part number 1300-BATT, if you wish to obtain this mounting kit. To the best of my knowledge, HBH is the only source for them.
The HBH battery tray is a welded aluminum piece which had a sanded finish. The steel retaining strap arrived with a black painted finish. The HBH pieces displayed quality workmanship, fit, form, and function. EDIT TO ADD: The HBH kit arrived with no instructions whatsoever.
Here's a photo that may give some idea to the size difference between the Yuasa and Odyssey. Depth is about the same, but the Odyssey is a bit taller, and quite a bit longer.
This next photo shows my OEM battery location before I removed the Yuasa. There are three wiring items shown here which are not stock. First are the two wires within the corrugated loom cover on the left which lead to an accessory fuse block located in the rear of the bike. Second is the Battery Tender harness with the plug connection tie-wrapped to the OEM battery cover in the lower-right corner. And third is an extra ground cable running from the battery to the chassis beneath the saddle.
After disconnecting and removing the Yuasa battery, the next step is to remove the steel bracket from beneath the OEM battery box. This bracket supports the weight of the battery while the plastic box does little more than restrict longitudinal and transverse movement, and provide splash protection from the rear tire. The machine screw in the bottom of OEM battery box requires a 5mm Allen? wrench while a 10mm socket will loosen the two bolts from the inboard side of the bracket. No fasteners were provided with the HBH kit, so the two OEM bracket bolts will be used to attach the HBH battery tray.
After the OEM support bracket is removed, the HBH battery tray can be temporarily bolted in place. With the HBH tray in position, layout lines were eye-balled and transferred to the OEM battery box for trimming. In the following photo, the HBH tray has already been removed, and the masking tape I used to layout my cutting lines (red arrows) remains.
Most of the trimming was accomplished with a 32-TPI hacksaw blade held in a gloved hand, and some of the cuts were done with tin-snips. After the "first round" of trimming, the HBH tray was reinstalled for test fitting the Odyssey battery. Note that one must recycle the OEM bracket bolts in order to mount this tray.
A "second round" of trimming saw this section of the OEM battery box falling to the tin-snips.
The Odyssey has landed. Note that the PC545 is installed with the negative (ground) terminal to the bottom. The terminal is uncomfortably close to the aluminum mounting tray to allow positioning the positive terminal at the bottom.
The photo below shows another fastener being recycled. This bolt came from the OEM battery strap, and is being used again for strap-duty. The bolt attaches the HBH battery strap to an unused tapped hole in the rear ABS brake modulator. Yes, that means the strap fits only ABS-equipped models of the ST1300. Owners of non-ABS models may be able to fabricate a different attachment point.
The second attachment requires that the installer drill a hole in the OEM battery box, and provide his own fastener. I used a 6mm x 35mm long bolt, a fender-washer on the plastic side, a standard flat washer on the near side against the steel strap, a standard 6mm nut, and a self-locking 6mm nut ... all made of stainless steel.
After trimming the OEM battery tray, it becomes evident that a considerable amount of road wash and debris would have instant access to the battery area from the rear tire. A piece of sheet rubber (this piece is 3/32" thick) was fitted with a single pop-rivet to serve as a splash screen, and hopefully keep debris collection to a minimum.
Fitting, trimming, and physically mounting the battery in its new tray was relatively easy in comparison to the electrical work I encountered. Ground cables did not need to be lengthened, but getting them attached to the battery with an Allen? head machine screw was testing my patience. I eventually cut a longer 6mm bolt and used the threaded portion as a stud which was securely installed in the battery's negative terminal. Then it was fairly easy to attach cables using a nut, which in turn was secured with a self-locking nut ... once again, all made of stainless steel.
The positive cable needed to be longer than the OEM harness would allow. I had anticipated this, and purchased a length of small battery cable before the installation began. Dis-assembling the Honda cable connectors brought a pleasant surprise ... they were soldered. And though it made for more work to get them apart, I appreciate that connection method over a simple crimped connection. Likewise, when I assembled the longer harness, I also soldered the connections. I had to use a small torch for soldering because the connectors had too much mass for my electric soldering gun to be effective. Here's a photo roughly illustrating my final wiring arrangement, though it lacks the Battery Tender harness which was installed later.
Here's a shot of the final installation, and the Battery Tender connection can be seen tie-wrapped to the feed tube between the rear brake reservoir and rear master brake cylinder. Time for a test ride!
I hope this information helps those who would otherwise skip the chance to install the Odyssey.
Attachments
-
 user9582_pic11655_1255138884.jpg82 KB · Views: 173
 -
 01 - Yuasa Odyssey side-by-side.JPG96.2 KB · Views: 172
 -
 02 - OEM batt area exposed.JPG92.6 KB · Views: 166
 -
 03 - remv brkt fr blw batt tray.JPG41.2 KB · Views: 152
 -
 04 - layout cut lines with tape.JPG68.8 KB · Views: 150
 -
 05 - 1st trimming.JPG79.8 KB · Views: 149
 -
 06 - pre-fit HBH batt-tray.JPG54.1 KB · Views: 149
 -
 07 - needs more trimming.JPG81.2 KB · Views: 153
 -
 08 - test fit batt in HBH tray.JPG72.6 KB · Views: 150
 -
 09 - re-use OEM strap bolt.JPG88.4 KB · Views: 147
 -
 10 - drill 2nd strap hole.JPG67.3 KB · Views: 142
 -
 11 - rubber spray skirt.JPG130.6 KB · Views: 140
 -
 12 - batt conns wired.JPG108.5 KB · Views: 146
 -
 13 - finished.JPG63.2 KB · Views: 142
Last edited by a moderator:


