
ChucksKLRST
Team Colorado
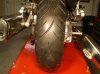
Installing rear wheel on a ST1300.
Disclaimer: This Photo essay is not a replacement for the service manual. My goal is to maybe enhance ones understanding of the service manual and make it a bit easer thru some of my pictures. At no time do I recommend relying solely on these photos and my instructions. As a wise old instructor once told me "RTFB square." Enjoy, good luck.
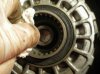
Photo 1. Clean old molly off of wheel hub and pumpkin splines.
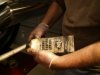
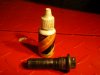
Photo 2. Lube pumpkin splines with Honda Molly
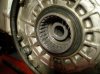
Photo 3. Lube wheel hub with Honda Molly ( be some what liberal but don't over do)
Photo 4. Install wheel into pumpkin making sure wheel splines mate with pumpkin splines. Might take a couple of try's to get them to slide in.
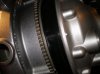
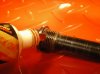
Photo 5. Clean axle
Photo 6. Grease axle with axle grease. DO NOT use Molly for this.
Photo 7. Slide axle into pumpkin side and stop before axle exits wheel on left side. Axle should slide with only hand force. DO NOT use excessive force. Might have to jiggle wheel a bit.
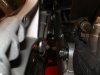
Photo 8. Inspect brake pads at this point and make sure there is enough space between pads to install caliper onto disk.
Photo 9. Work caliper on to Disk and align axle hole, and hand push axle the rest of the way through. Do not over force.
Photo 10. Honda says to replace Caliper Stopper bolt, because of the lock tight from the factory. I use the same bolt after I clean the old lock tight off and reapply a new coat of red lock tight. Works for me. You make your choice.
Photo 11. Apply a couple of drops of red lock tight to caliper stopper bolt.
Photo 12. Install caliper stopper bolt.
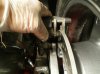
Photo 13. Set torque wrench to 51 ft lbs. (If you are going to do maint. on your bike please get a descent torque wrench)
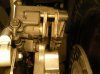
Photo 14. Access the caliper stopper bolt forward of the muffler above the cat converter, and tighten to 51 ft lbs.
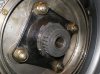
Photo 15. Install axle nut.
Photo 16. Using a 27 mm 6 point socket for tightening axle nut.
Photo 17. Set torque to 80 ft lbs and tighten axle nut to 80 ft lbs.
Photo 18. Re-install right exhaust
Photo 19. Re-install lower rear fender
Photo 20. Job complete, go test ride.
Now I am going riding, while you all reinstall your rear wheel. Mine is done.
Disclaimer: This Photo essay is not a replacement for the service manual. My goal is to maybe enhance ones understanding of the service manual and make it a bit easer thru some of my pictures. At no time do I recommend relying solely on these photos and my instructions. As a wise old instructor once told me "RTFB square." Enjoy, good luck.
Photo 1. Clean old molly off of wheel hub and pumpkin splines.
Photo 2. Lube pumpkin splines with Honda Molly
Photo 3. Lube wheel hub with Honda Molly ( be some what liberal but don't over do)
Photo 4. Install wheel into pumpkin making sure wheel splines mate with pumpkin splines. Might take a couple of try's to get them to slide in.
Photo 5. Clean axle
Photo 6. Grease axle with axle grease. DO NOT use Molly for this.
Photo 7. Slide axle into pumpkin side and stop before axle exits wheel on left side. Axle should slide with only hand force. DO NOT use excessive force. Might have to jiggle wheel a bit.
Photo 8. Inspect brake pads at this point and make sure there is enough space between pads to install caliper onto disk.
Photo 9. Work caliper on to Disk and align axle hole, and hand push axle the rest of the way through. Do not over force.
Photo 10. Honda says to replace Caliper Stopper bolt, because of the lock tight from the factory. I use the same bolt after I clean the old lock tight off and reapply a new coat of red lock tight. Works for me. You make your choice.
Photo 11. Apply a couple of drops of red lock tight to caliper stopper bolt.
Photo 12. Install caliper stopper bolt.
Photo 13. Set torque wrench to 51 ft lbs. (If you are going to do maint. on your bike please get a descent torque wrench)
Photo 14. Access the caliper stopper bolt forward of the muffler above the cat converter, and tighten to 51 ft lbs.
Photo 15. Install axle nut.
Photo 16. Using a 27 mm 6 point socket for tightening axle nut.
Photo 17. Set torque to 80 ft lbs and tighten axle nut to 80 ft lbs.
Photo 18. Re-install right exhaust
Photo 19. Re-install lower rear fender
Photo 20. Job complete, go test ride.
Now I am going riding, while you all reinstall your rear wheel. Mine is done.
Attachments
-
 IMGP1438r.jpg90.5 KB · Views: 419
 -
 IMGP1439r.jpg113.8 KB · Views: 417
 -
 IMGP1440r.jpg141 KB · Views: 418
 -
 IMGP1441r.jpg115.7 KB · Views: 378
 -
 IMGP1442r.jpg143.8 KB · Views: 349
 -
 IMGP1443r.jpg137.7 KB · Views: 381
 -
 IMGP1446r.jpg98.9 KB · Views: 359
 -
 IMGP1449r.jpg99.7 KB · Views: 360
 -
 IMGP1450r.jpg95.2 KB · Views: 355
 -
 IMGP1451r.jpg126.9 KB · Views: 352
 -
 IMGP1452r.jpg65.9 KB · Views: 334
 -
 IMGP1453r.jpg145.1 KB · Views: 354
Last edited by a moderator:

