I wish the video had subtitles . Normally I slow the speed to 75% to make sure I heard it all . In the workshop he needs a lamp shining towards the ceiling to help the picture . Or one of those reflective things they use for tv shots on dull days . Even though I have been paying attention I suddenly thought "I knew about T1 but what`s T4 ?". On a small Ford car my first attempt at tappets had the car sounding like a diesel till I put it right .
I was surprised he struggled to get the feeler gauge in so tight . There will always be ( 2 ) films of oil between surfaces when it`s running (?)
Checking clearance is fine but I want to avoid the rest of that job . Thanks for the Haynes manual warning .
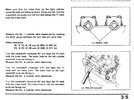
The video my friends Fred and Rodger made many years ago is not perfect, but it’s the beST we’ve got… for now (somebody feel free to do another). If you read the errata info as directed in the AOW article, the issue of Rodger forcing the feeler gage is covered (don’t force it). Sorry, I don’t have a picture of the T4 marking but if you follow the steps described in the manual and clearly written on the worksheet you’ll see the mark.
As to the clearance when running — IMO, the engineers at Honda figured out what the gap between the cam lobe and top of the shim bucket should be when the engine is cold, but that when the engine is running and warmed up and the parts heat expand, the gap between the cam and top of the shim bucket closes so that they only have a thin film of oil between when the lobe is not pushing down the bucket/opening the valve. IOW, they figured out the degree of heat induced expansion of the the valve actuation parts. When at operating temperature you don’t want the cam keeping the valve partially open when it should be fully closed! I hope that makes sense…
As to method, I’ve posted many times here on this forum and ST-Riders.net about using SAE instead of metric and forgoing the math and formulas entirely. Look at the marking on the shim in question and look at the shim list to select the one to achieve the desired change (one .025mm increment for each thousanth of an inch change), usually thinner. Doesn’t get simpler than that and is probably the method your shop will use. Remember - .001” = .0254mm (virtually the same increment difference between the Honda shims).
BTW, I have a very expensive metric micrometer and all the Honda shims I’ve measured were exactly as marked.
John
Video errata:
Video Errata
Courtesy Bob Meyer
ERROR 1: In the shim kit video, the narrator explains that you can push a feeler gauge in between the camshaft and bucket with as much force as is necessary to get it in. He says "you can't compress the valve spring with the feeler gauge."
THIS IS A MAJOR ERROR. While it may be true for the very thin feeler gauges used on the intake valves, the feeler gauges used on the exhaust valves are definitely thick enough to compress the valve springs. Jamming the feeler gauges in with the force shown in the video will give erroneous readings.
There is a bit of art involved in knowing how a feeler gauge should "feel." Attached to this explanation is a series of e-mails from the STOC mailing list on this topic. The best advice I've seen in all my years wrenching bikes come from John Walters (aka PenguinBiker):
So the question is: how hard should I have to push the feeler gauge in? Howmuch drag should there be on the gauge that accurately measures the gap?
Get (buy or borrow) a micrometer. [Note: a micrometer is included in the shim kit. Ed.] Take a feeler gauge that is roughly the size you intend to use, then set the micrometer at whatever size the feeler gauge is, drag the feeler gauge through the micrometer.
_That_ is how much drag you should have on the feeler gauge. (Note: if there is a sharp angle on the gauge when you push it in then there will be more drag.)
Error 2: The narrator in the video removes the black plastic covers on the front of the engine that cover the timing belt and cam drive gear. This is not necessary unless you rotate the engine while a camshaft is removed. Needless to say, do not rotate the crankshaft while one or more cams are removed. Removing these covers won't hurt anything, but it's unnecessary work.
Error 3: This one is actually caught and corrected in the video, but the narrator still makes things harder than they need to be. The error is that the narrator confuses metric measurements (the shims) and English measures (the feeler gauges), This is caught and corrected, but the narrator goes to a great deal of effort to convert metric to English and back. The conversion is unnecessary. All the feeler gauges in the kit are marked in metric. If you do all the measurement and calculations in metric, everything will be much simpler.


